ShipMyLPs · client portal manual
How to work with the portal.
This manual gives step-by-step instructions for everything you do in the shipmylps.com customer portal: creating orders, reviewing orders and shipments, reading your stock, announcing incoming shipments to our warehouses and connecting your online store. Screens are shown with a demo account.
0Before you start
You need three things, all of which we set up with you when you join:
- A portal login. You sign in with your e-mail address and a password we send you. Each person on your team can have their own account.
- Your releases in the system. We create them from your first inbound announcement or from the list you send us.
- A way to get your orders in. If you sell through Bandcamp, Big Cartel or any store connected to ShipStation (Shopify, WooCommerce, Etsy and others), we connect it and your orders flow in on their own; ask us and we set it up with you. You can also enter orders yourself in the portal, one at a time or by uploading a CSV or XLS file.
1Getting in
Sign in
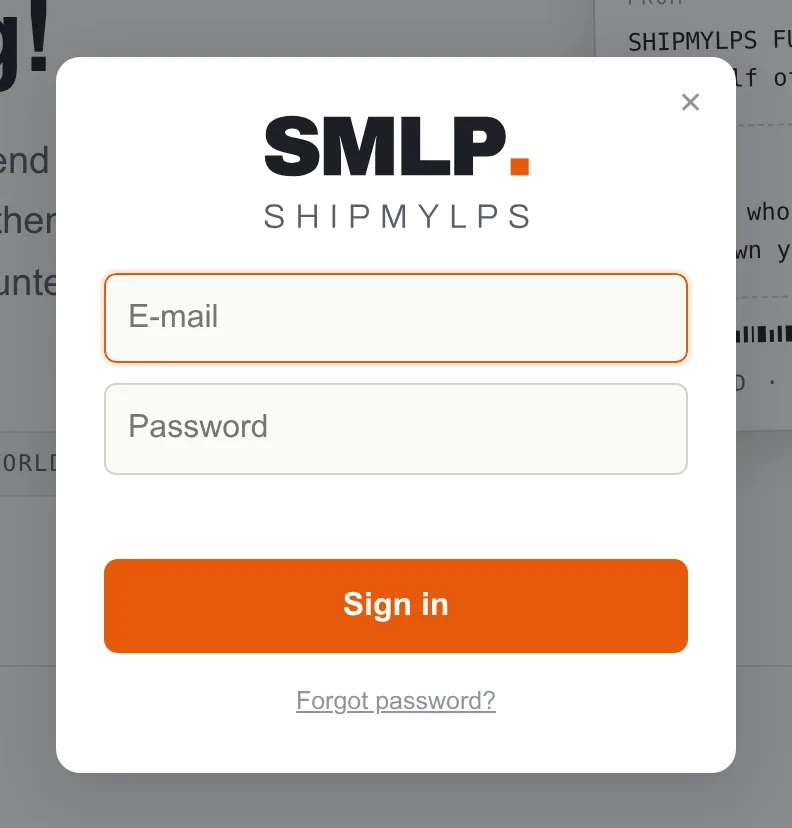
- Open shipmylps.com and click Login in the top right.
- Type your e-mail and password, then click Sign in.
Result: the Dashboard opens with your label name in the top right. You stay signed in on that device until you click Sign out.
If not: "Wrong e-mail or password" means one of the two is mistyped; after several failed attempts the login pauses for a few minutes. Use the password reset below rather than guessing.
Reset a lost password
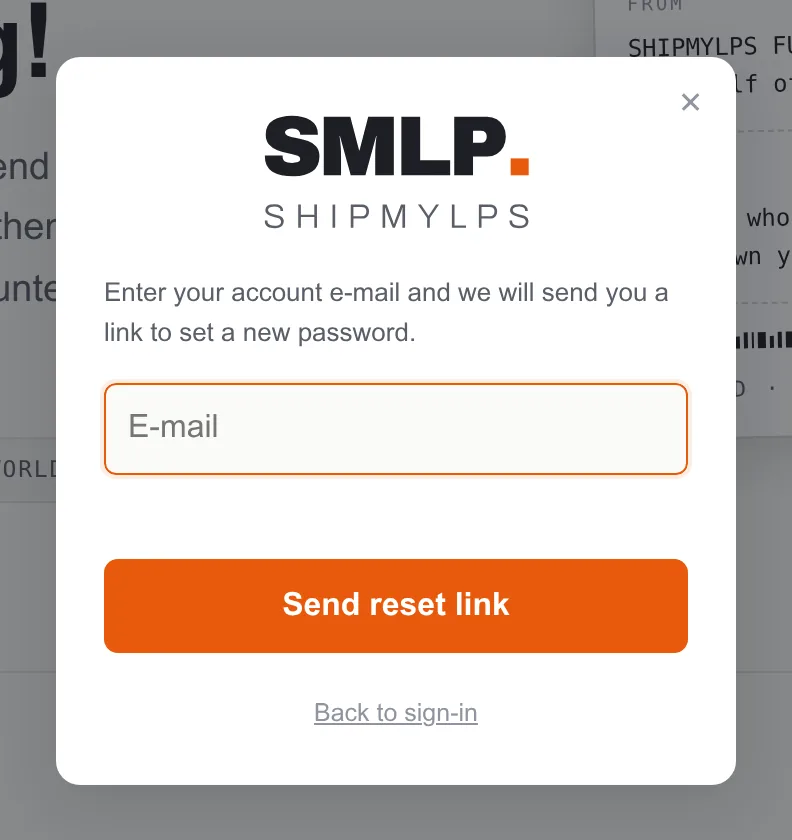
- In the sign-in dialog click Forgot password?
- Type the e-mail of your account and click Send reset link.
- Open the e-mail "Reset your ShipMyLPs password" and click the link. It works once, so finish the next step right away.
- Type the new password twice and click Save password, then sign in with it. You also get an e-mail confirming the change.
If no e-mail arrives: check spam, then write to from the address on your account and we reset it for you.
Switch between light and dark, sign out
- Click ◐ in the top right to switch the theme. The portal remembers the choice on that device.
- Click Sign out next to your name to end the session.
Getting around
Four tabs run along the top, each one answering a different question.
- What needs my attention today?
- A general overview of the day.
- Where is a particular order?
- I would like to create a new order or import a list of new orders.
- How many can I still sell?
- What is the movement history of a particular release?
- What is on its way to the warehouse?
- I would like to add new releases and/or announce an incoming shipment.
The number next to a tab shows how much is in progress there: orders not yet shipped, releases we hold for you, shipments not yet fully received. Clicking a row anywhere opens its detail in a panel on the right; ✕ or the browser back button closes it. On a phone the tabs are behind the ☰ button.

2Dashboard
Find what needs your action today
- Open Dashboard. Look at the two cards on the right: Needs attention (red) and Stock warnings (yellow). If both say "all clear" and "all healthy", nothing waits for you.
- Otherwise scroll to Needs your attention. Each row is one order with a tag that says why: address check means the carrier rejected the delivery address and you have to correct it (see Fix an address the carrier rejected); delivery issue means a parcel came back, was damaged or got lost and we are handling it (see When a parcel comes back or is lost).
- Click the row to open the order and act on it.
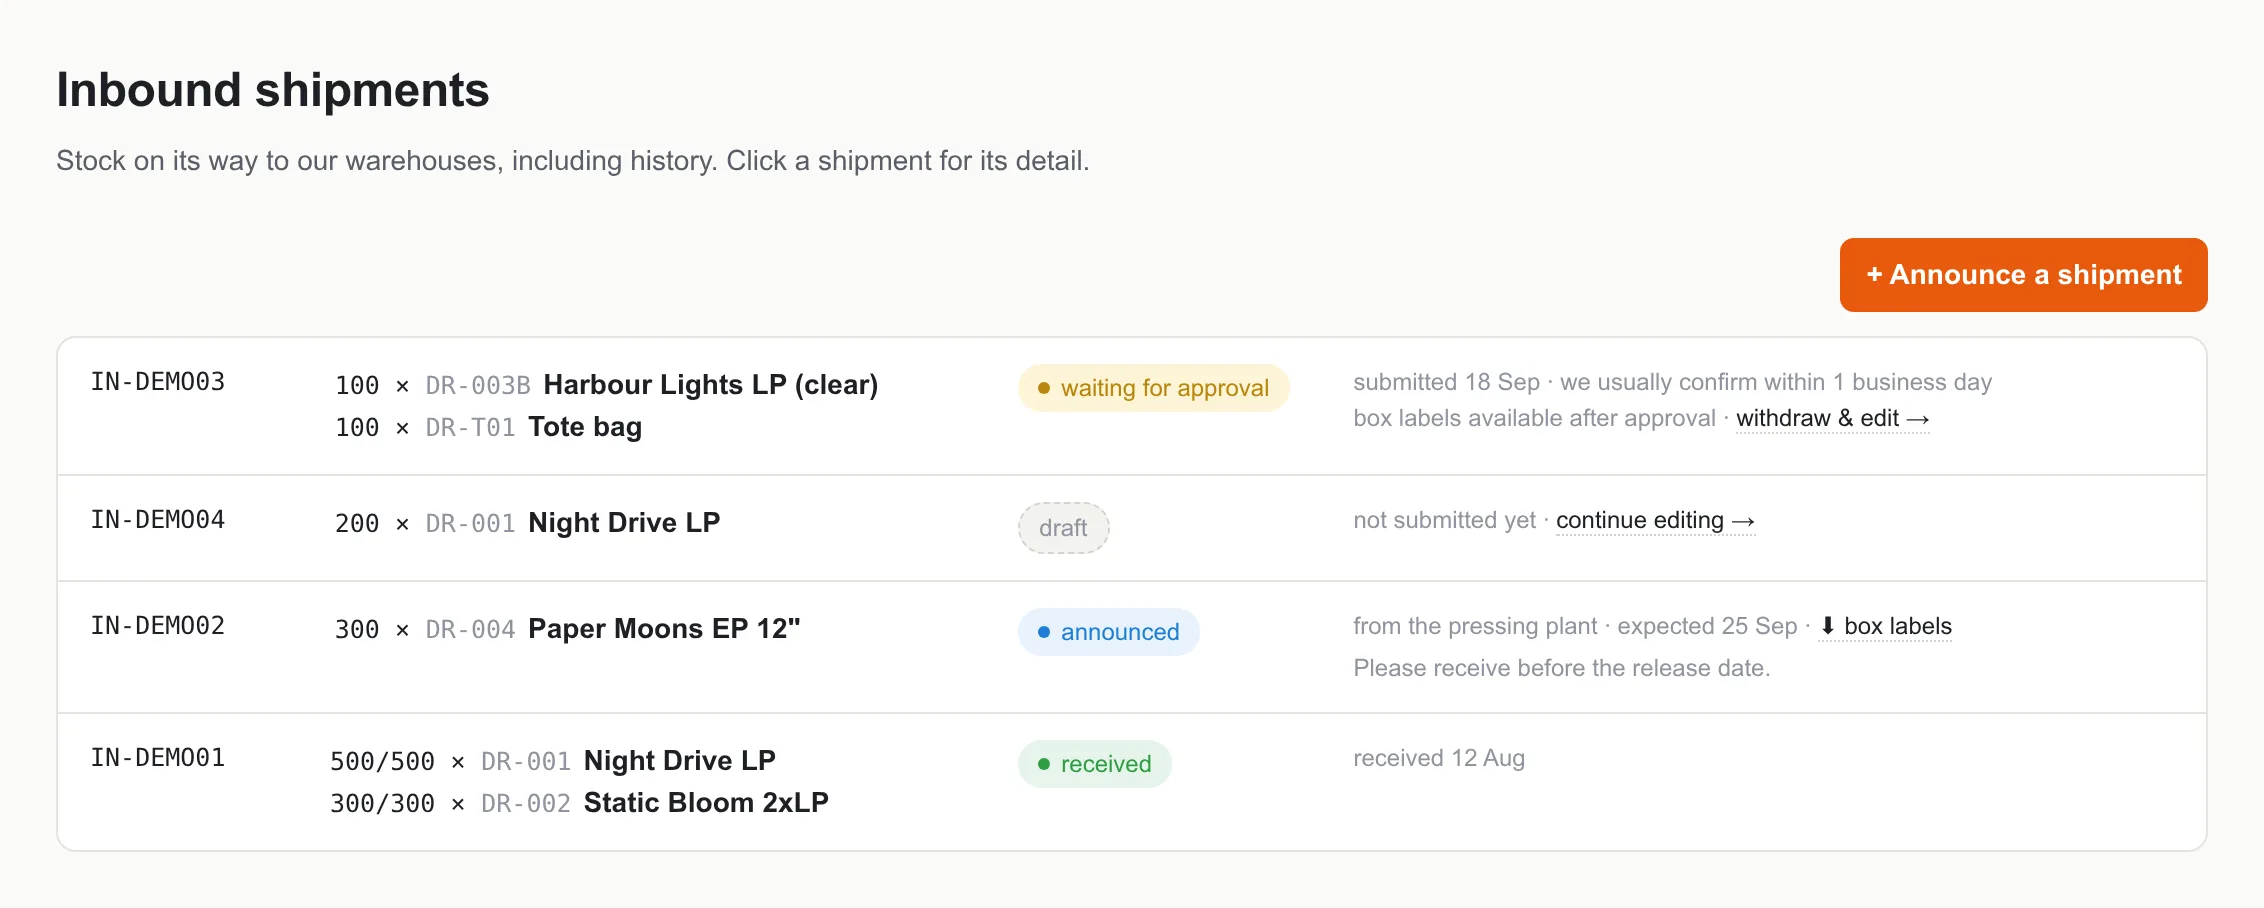
- Check On its way for your inbound shipments. A row marked waiting for approval is with us; draft means you have not submitted it yet, click continue editing → to finish it.
- Check Stock warnings: every release listed has fewer than 50 pieces available, even after counting stock already announced to us. Plan a repress or an inbound shipment.


The cards
| Card | What it counts | Click it to see |
|---|---|---|
| In preparation | Orders accepted but not yet shipped. | Orders filtered to In preparation. |
| Shipped this week | Parcels handed to a carrier in the last 7 days. | Orders shipped in the last 7 days. |
| Delivered | Parcels the carrier reports as delivered. | Orders filtered to Delivered. |
| Needs attention | Orders with an address check or an open delivery issue. | The list below the cards. |
| Stock warnings | Releases with fewer than 50 pieces available including incoming stock. | Inventory. |
3Orders
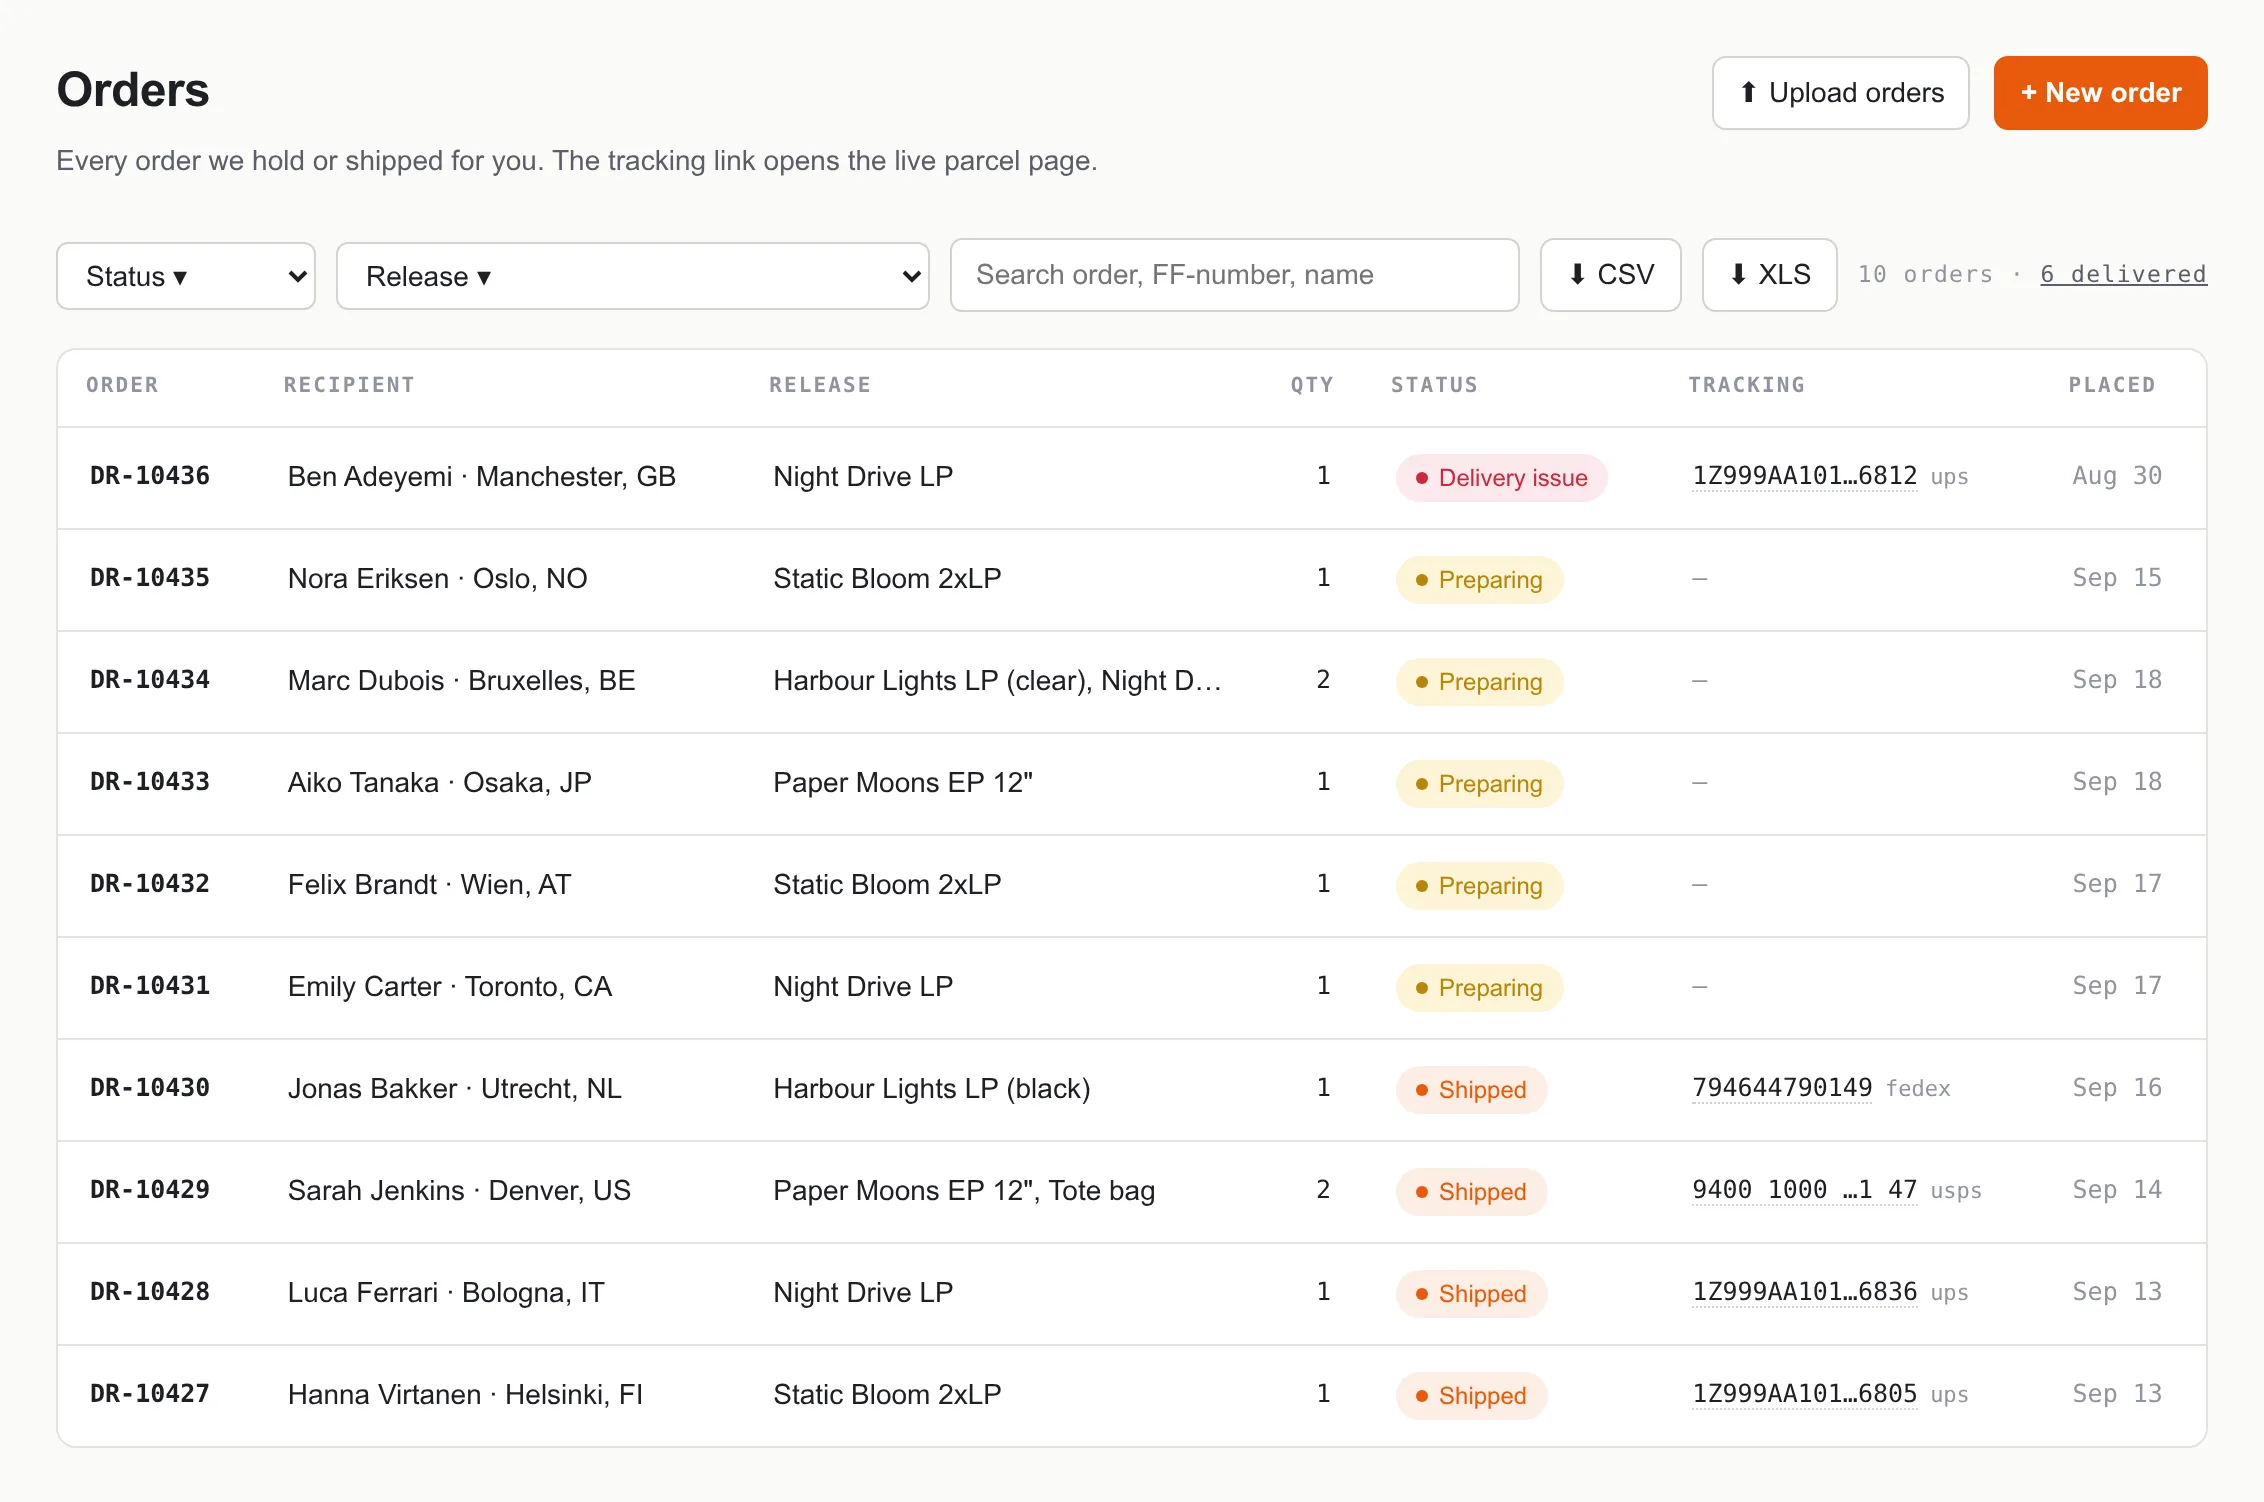
The Orders tab lists every order we hold or have shipped for you, whether it came from your store or you typed it in. Delivered orders are hidden from the plain list to keep it short; the count next to the search box tells you how many there are and links to them.
Find an order
- Open Orders.
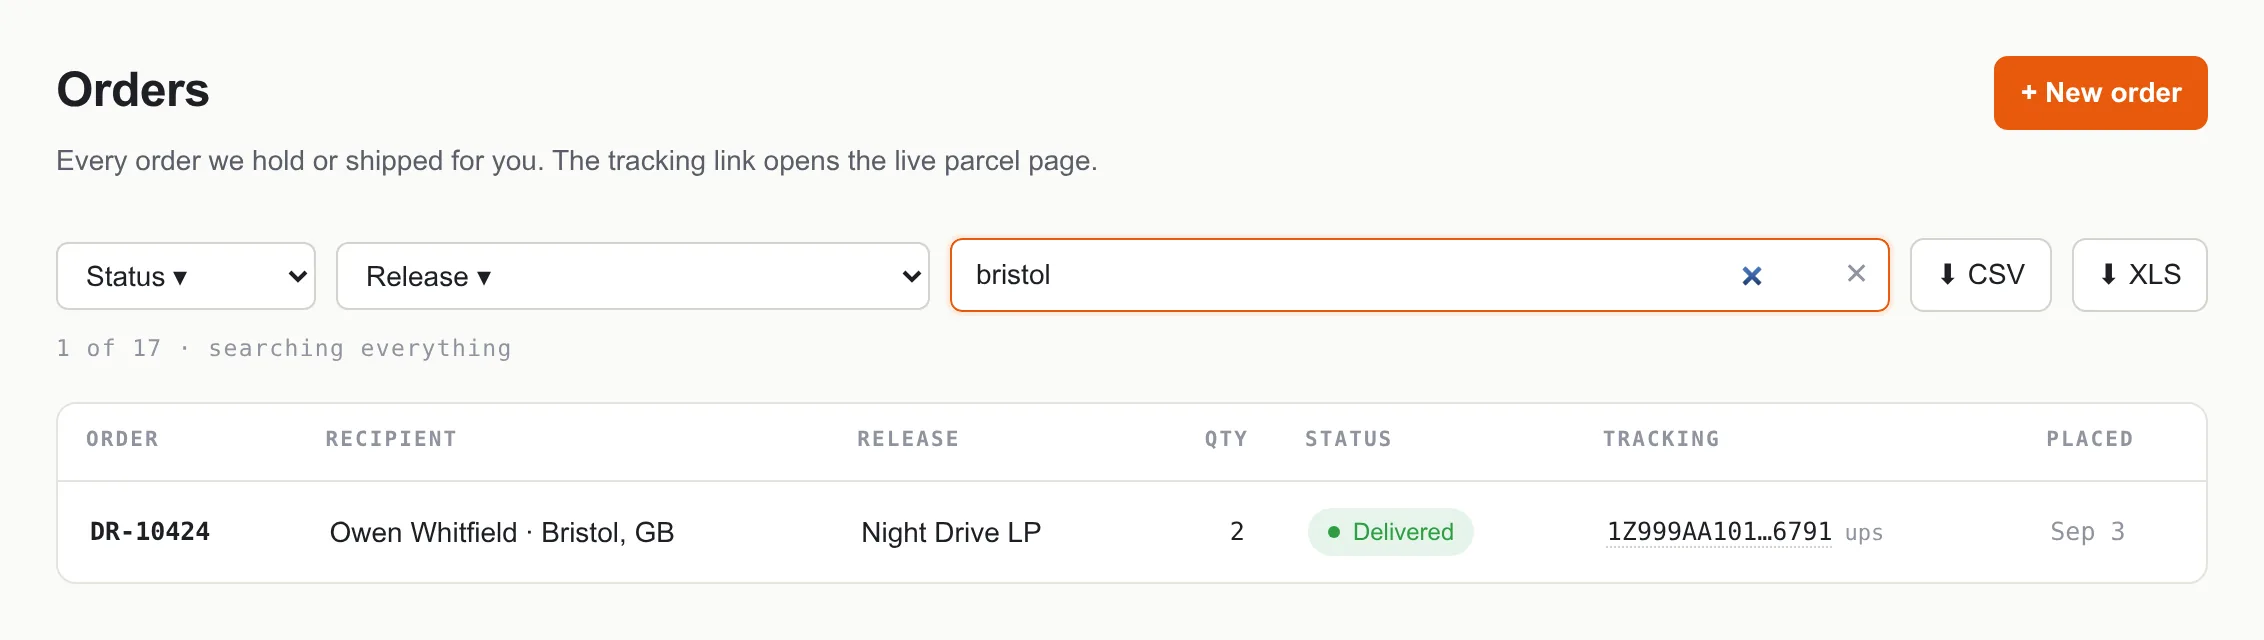
- Type into the search box: an order number, a ShipMyLPs number (FF-…), the recipient's name, a city or a release name. The list narrows as you type and includes delivered orders.
- Or narrow the list with Status ▾ (In preparation, Received, Preparing, Shipped, Delivered, Delivery issue, Cancelled) and Release ▾. Active filters show as pills above the table; click ✕ on a pill to remove it.
- Click a column header (Order, Recipient, Release, Qty, Status, Placed) to sort by it; click again to reverse.
- Click the row to open the order.
Check tracking and share the customer tracking page
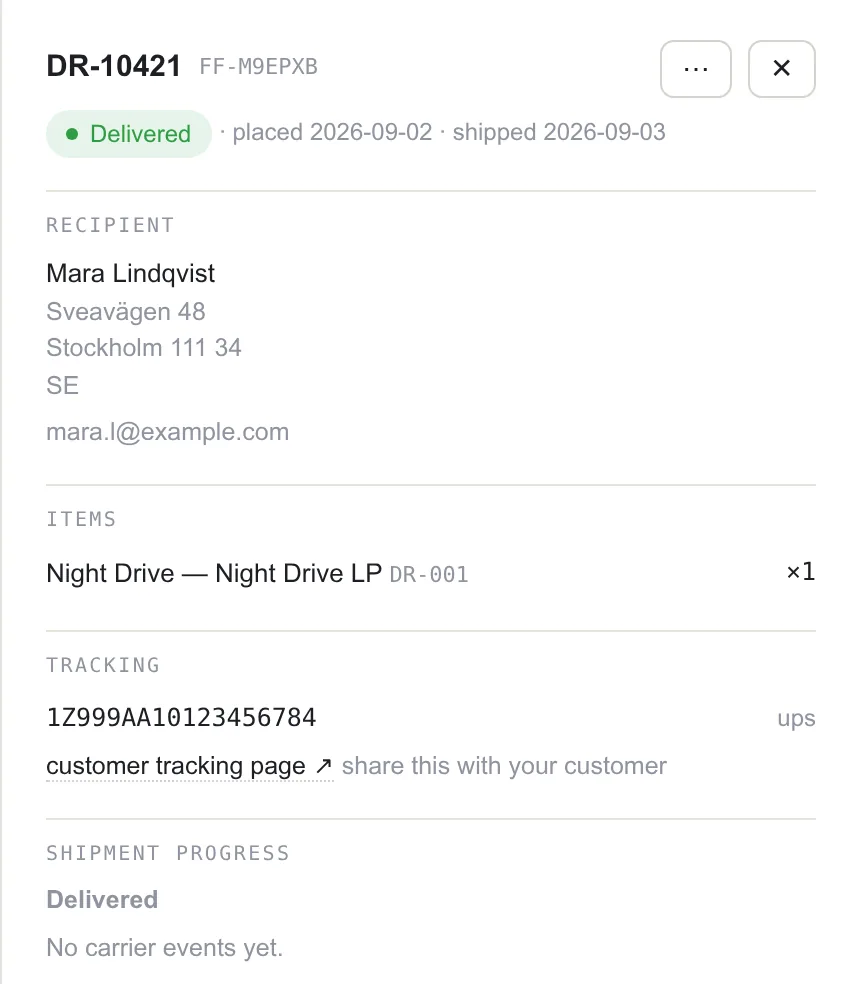
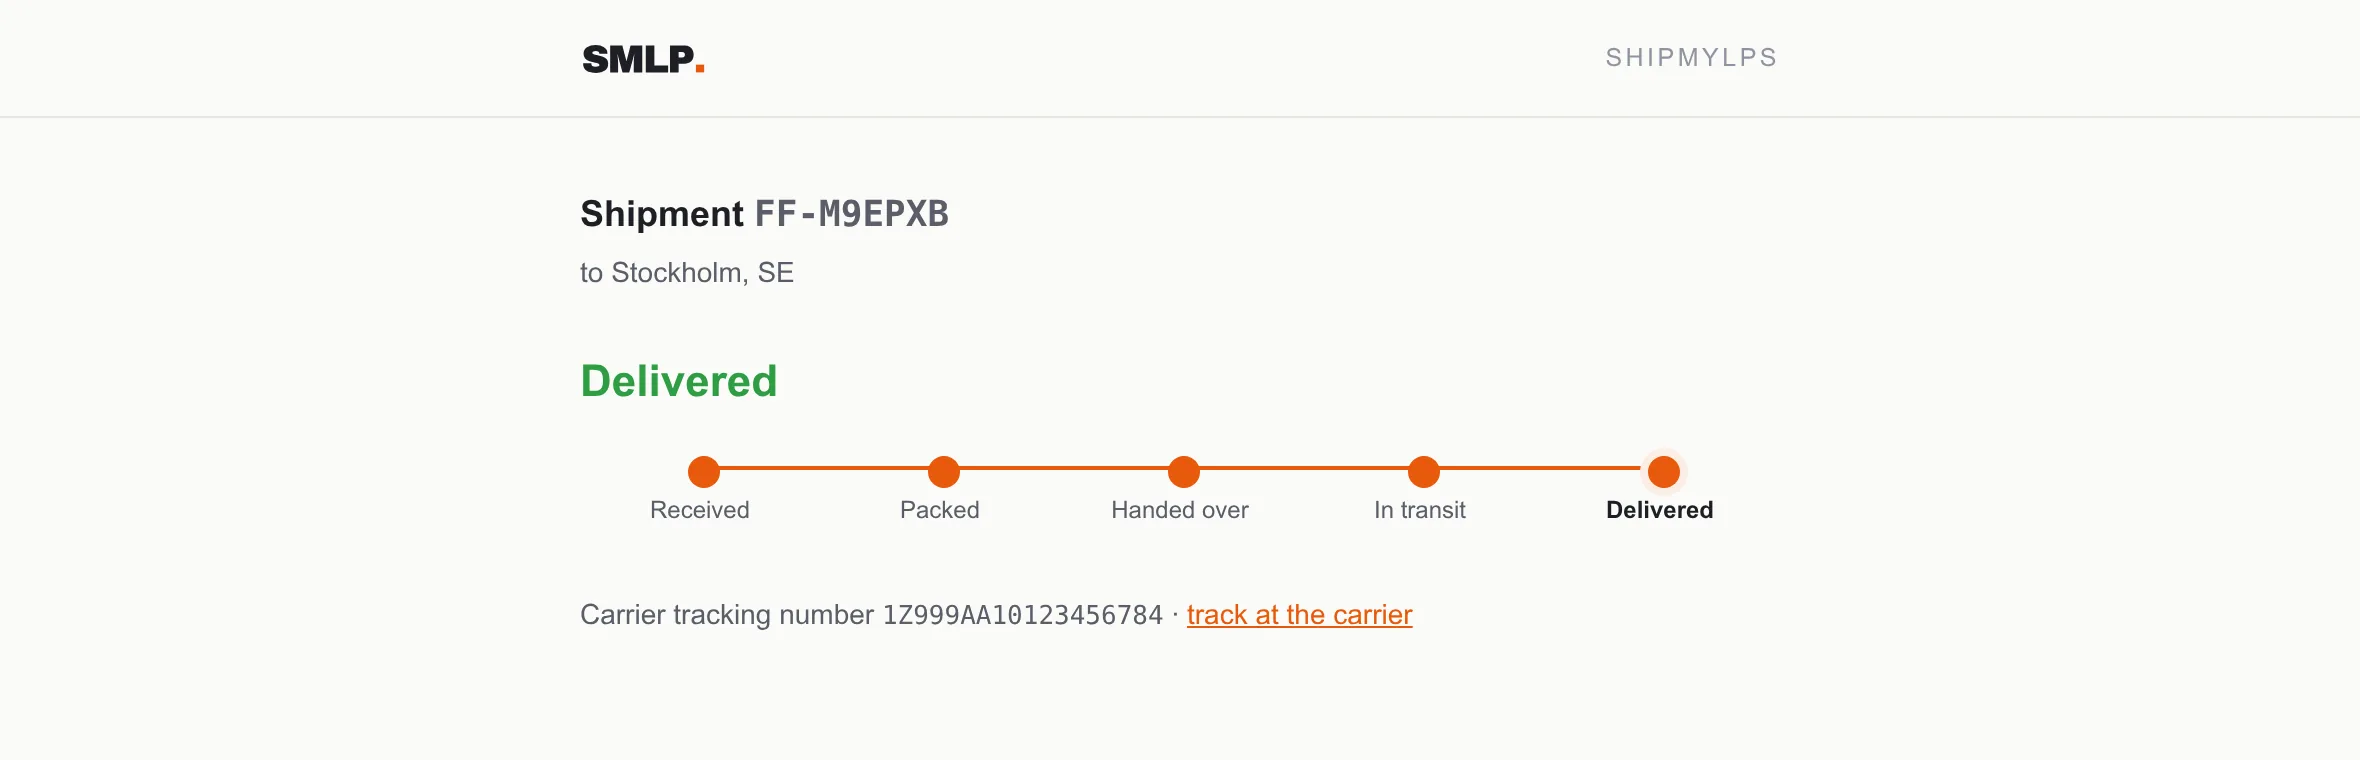
- Open the order. In the Tracking block you see the carrier's tracking number; click it to open the carrier's own tracking site.
- Below it, customer tracking page ↗ opens a page on shipmylps.com that shows only this parcel's progress. Copy that link and send it to your customer; it needs no login and shows no other orders.
- The Shipment progress block at the bottom lists the carrier's scan events as they happen.
Export the list
- Filter or search until the list shows what you want to export. The export takes exactly the rows on screen.
- Click ⬇ CSV or ⬇ XLS. The file downloads with one line per order: order number, ShipMyLPs number, recipient, address, items, status, carrier, tracking number, dates.
Edit a recipient address
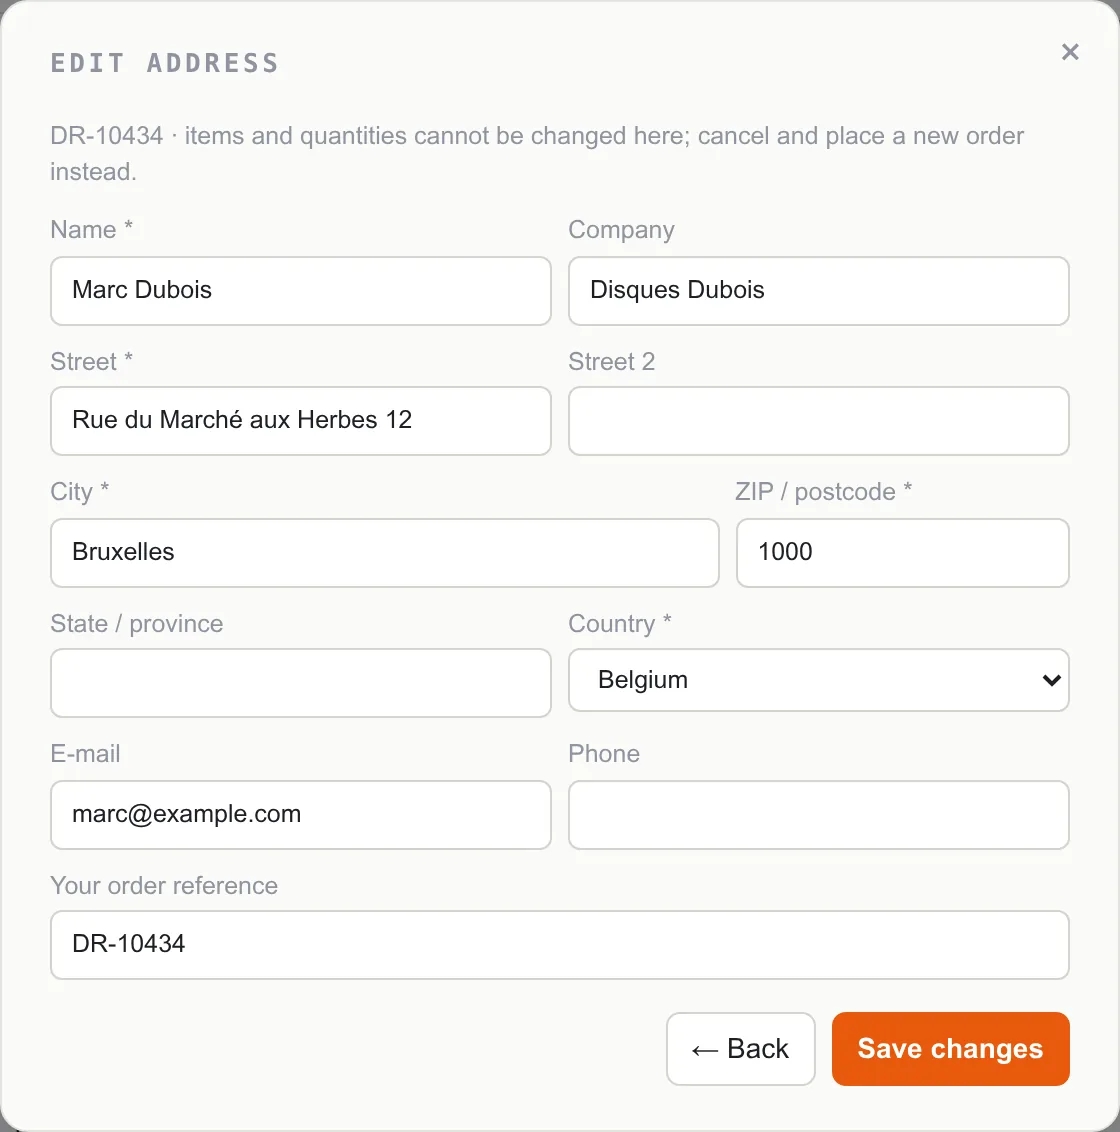
You can change the recipient, address, e-mail, phone and your order reference yourself as long as we have not started preparing the parcel. Items and quantities cannot be changed: cancel the order and place a new one instead.
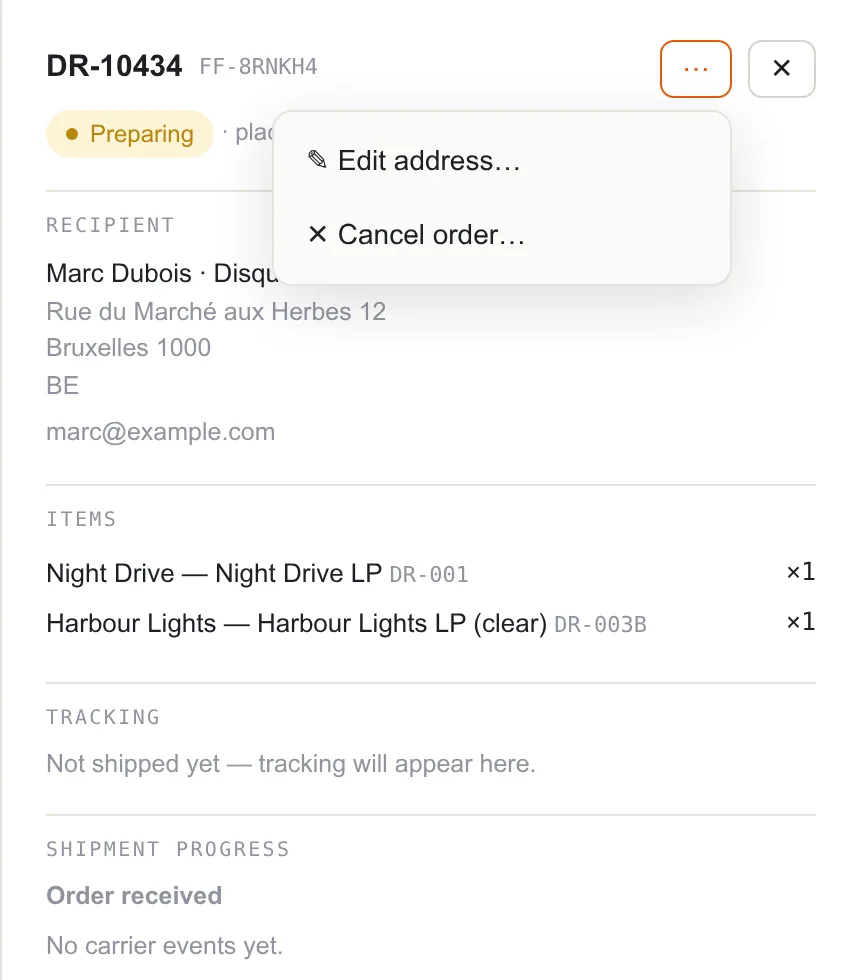
- Open the order and click ⋯ in the panel header.
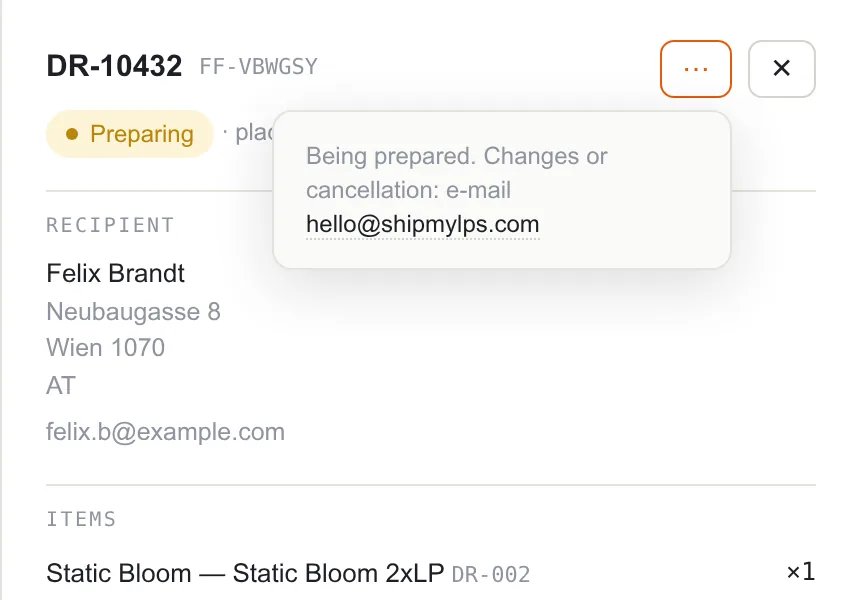
- If the menu shows Edit address…, click it. If it shows Being prepared instead, stop here: the parcel is already in a packing batch. E-mail with the order number and the new address; if the parcel has not left yet, we change it for you.
- Correct the fields. Name, street, city, ZIP and country are required; US and Canadian addresses also need the state or province.
- Click Save changes.
Result: the panel shows the new address. If the order had an address check, it disappears and the order goes into the next packing batch.
If not: "The order changed in the meantime, please reload" means we edited or batched it while your form was open. Reload the page and look again.
Cancel an order
- Open the order and click ⋯ in the panel header.
- If the menu shows Cancel order…, click it. If it shows Being prepared, stop here: e-mail with the order number; if the parcel has not left yet, we cancel it for you.
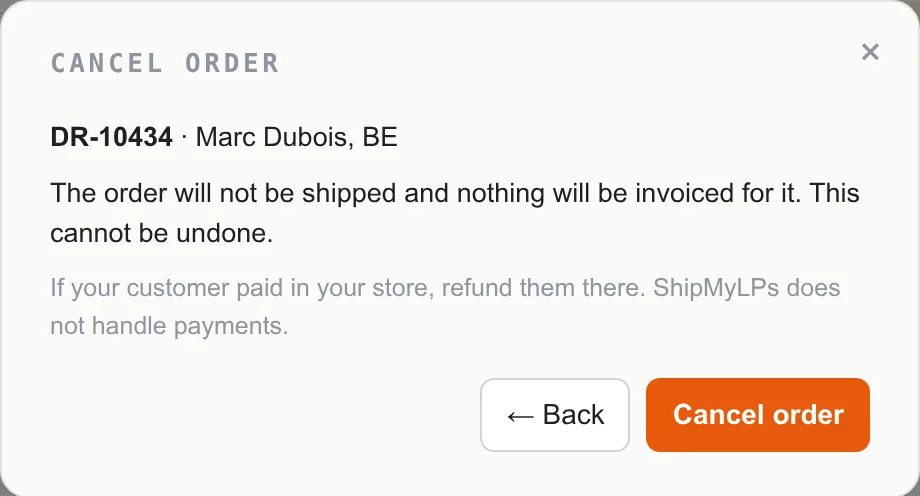
- Check the order number and recipient in the dialog, then click Cancel order.
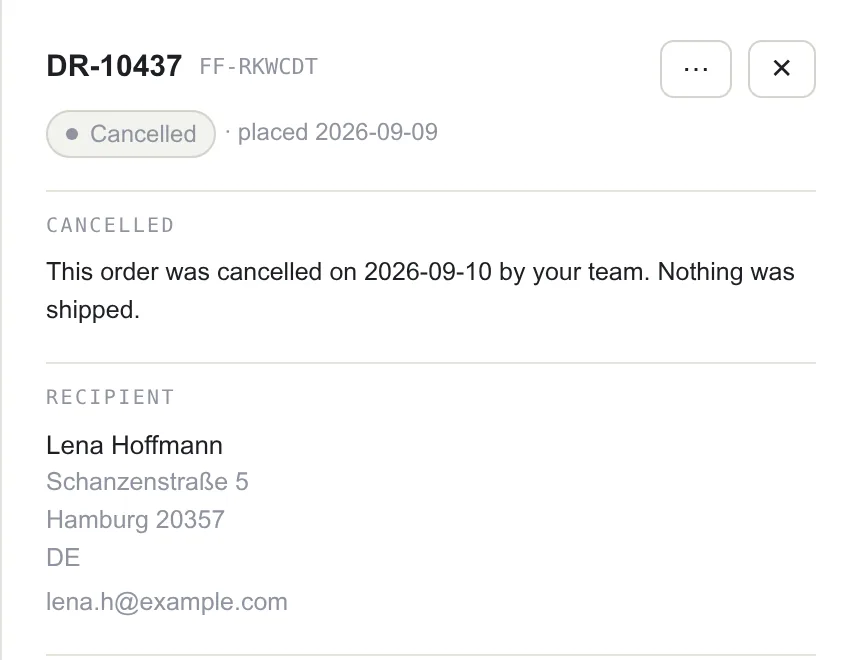
Result: the row shows Cancelled, the reserved stock is released and you receive a confirmation e-mail. Refund your customer in your store; ShipMyLPs does not handle payments.
If not: "already being prepared" means we took the order into a batch while you were looking at it. E-mail us and, if the parcel has not left yet, we cancel it for you. A cancellation before we touched the parcel is free; if the order was already picked or labeled, the cancellation fee from your price list applies.
Fix an address the carrier rejected
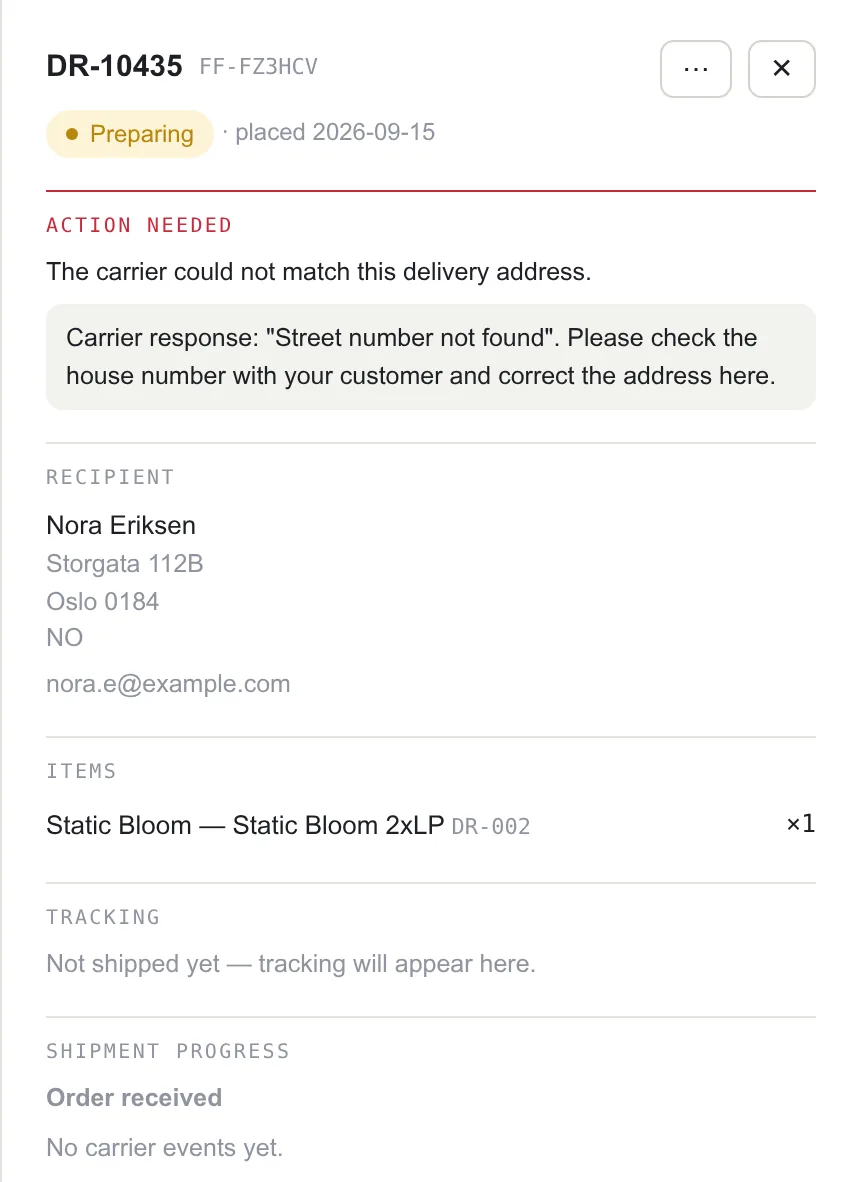
Addresses are checked online at the moment we print the label, against the carrier's own database of delivery points. Most rejections come from USPS, whose database knows every house number and every unit. The address can be perfectly fine for your customer and still be refused: USPS wants it written the way the post office has it on file. Typical cases are a missing apartment or suite number in a multi-unit building, a unit written differently ("4D" where USPS has "Apt 4"), or a street direction that is off (363 S Firestone Blvd where only 363 N exists). When a label is refused, the order stays with us, shows a red Action needed block with the carrier's remark and our note on what to look for, and appears on the Dashboard under Needs your attention.
- Open the order from the Dashboard row or from the Orders list and read the red block.
- Ask your customer not for their address, but for how it appears on mail they normally receive: the exact unit or suite, and the street name including N, S, E or W. If our note already suggests the likely correct form, confirm that with them.
- Click ⋯ → Edit address…, correct the fields and click Save changes.
Result: the red block disappears and the order goes into the next packing batch, where the carrier checks the address again. If it is refused a second time, the block comes back with the new remark; repeat with the customer.
If you only changed the phone or the reference: the address check stays, because the address itself did not change.
When a parcel comes back or is lost
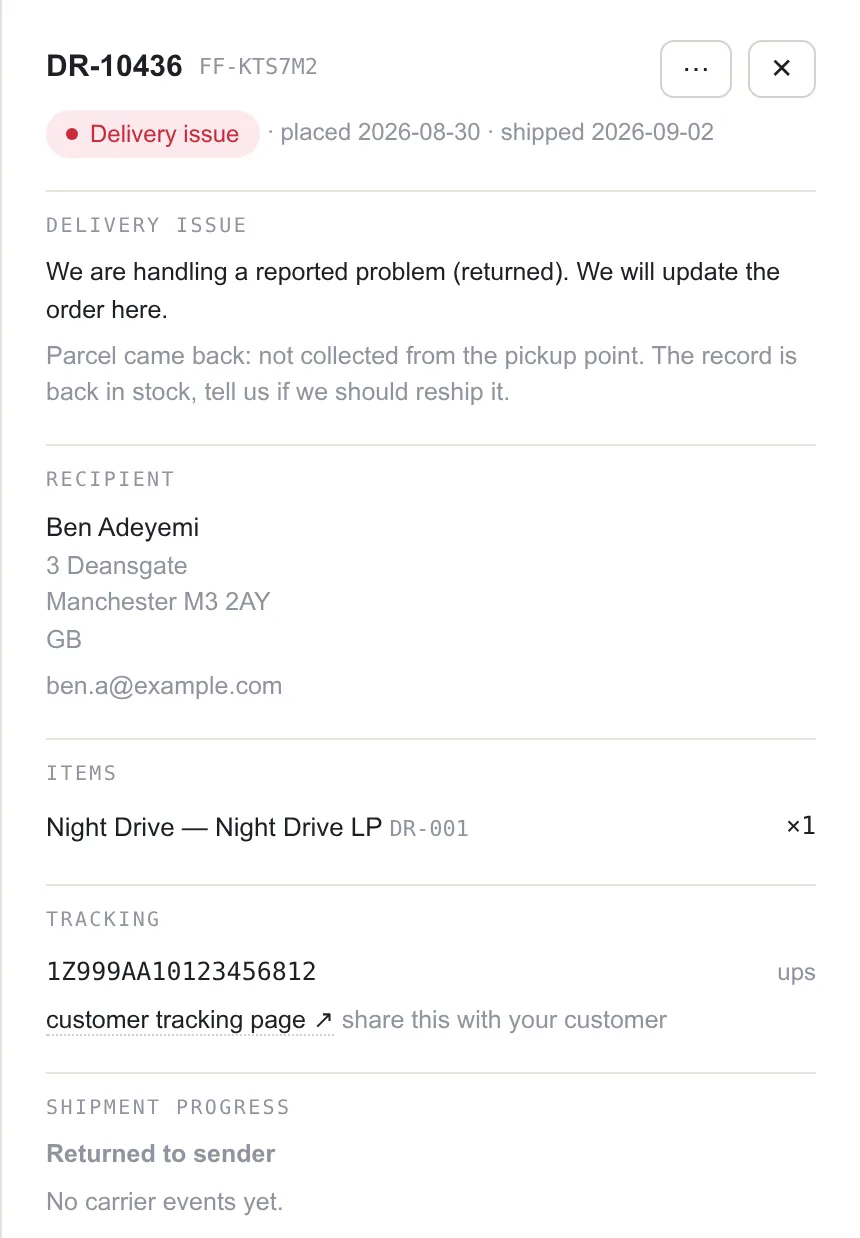
A parcel that is returned to us, arrives damaged or is lost by the carrier is marked Delivery issue. We open the case; you decide what happens next.
- Open the order. The Delivery issue block says what happened and what we did so far (for example "back in stock" for a return).
- Reply to with the order number and your decision: reship to the same address, reship to a new address (send it), or leave it in stock and refund your customer.
- We carry out the decision and note it in the same block. A reshipment gets its own tracking number in the same order.
Result: when the case is closed, the order returns to its normal status and keeps the note as history.
Order statuses
| Status | Meaning | You can |
|---|---|---|
| Received | The order arrived from your store or was placed and waits for our check. | Edit the address, cancel. |
| Preparing | Accepted and stock reserved; in the queue or already being picked and packed. | Edit or cancel until the ⋯ menu says Being prepared; after that, e-mail us. |
| Shipped | Handed to the carrier, tracking is live. | Share the tracking page. |
| Delivered | The carrier confirmed delivery. | Nothing needed. |
| Delivery issue | Returned, damaged or lost. We are handling it. | Tell us what to do with the parcel. |
| Cancelled | Nothing was shipped. | Place a new order if needed. |
4Enter or upload orders
Use this for orders that do not come through a store connection: a sale by e-mail, a promo copy, a replacement, a wholesale box. The order is shipped from stock like any other.
Enter an order
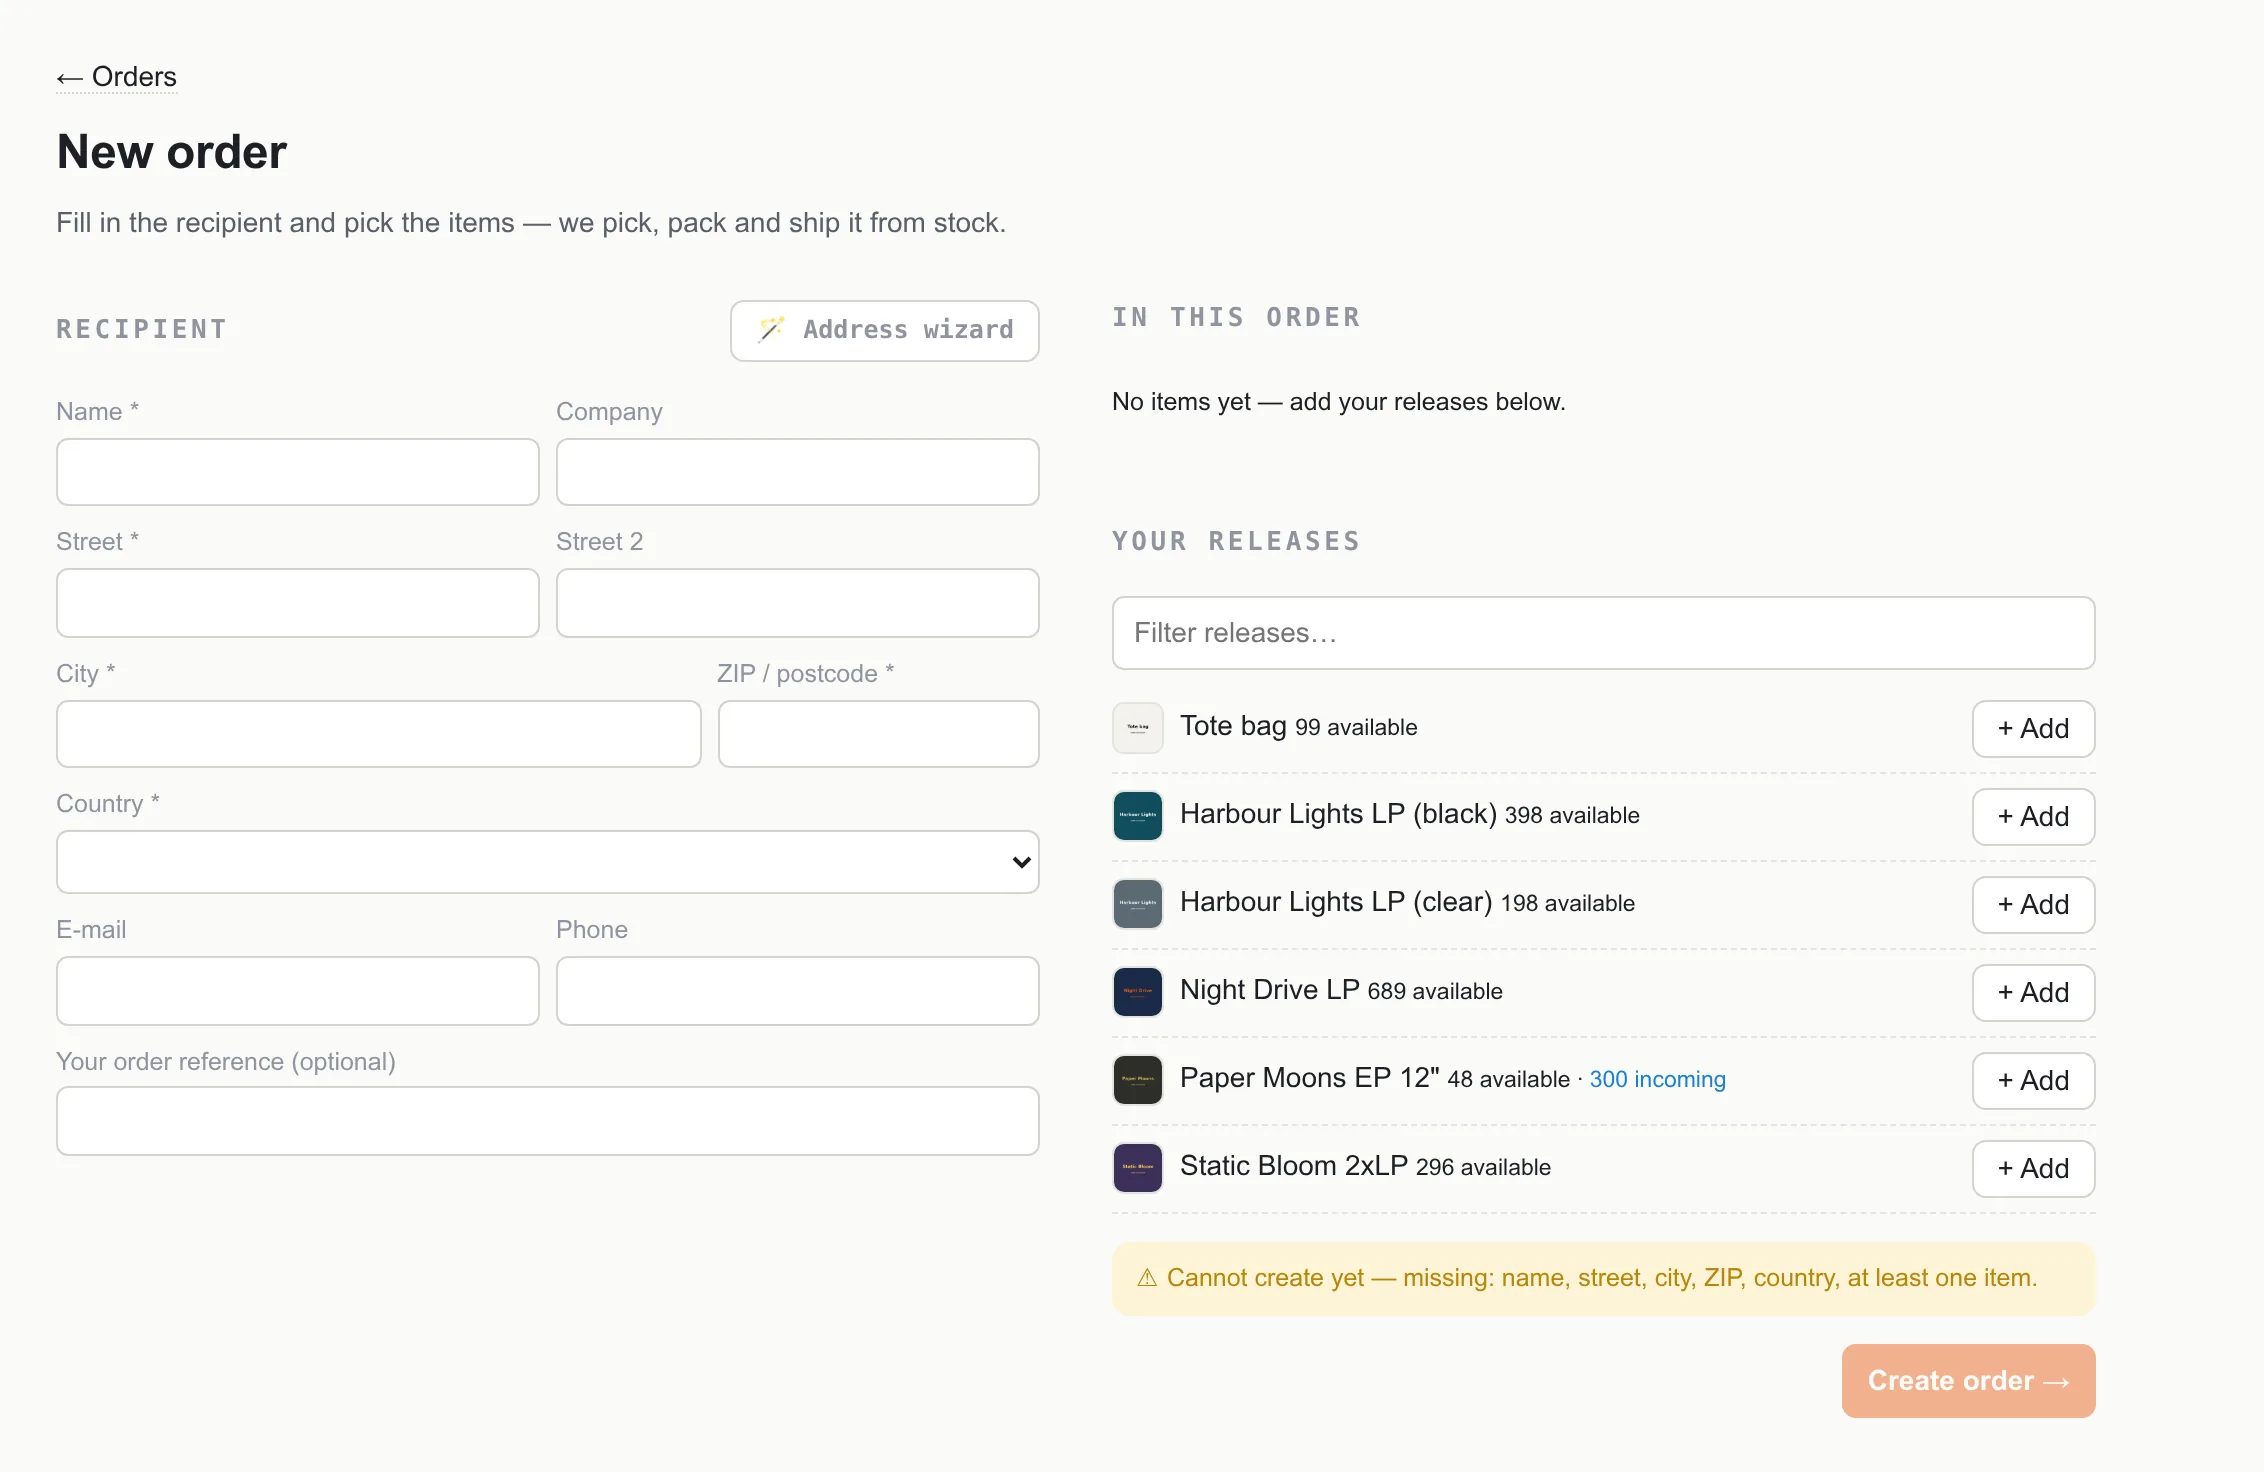
- Open Orders and click + New order in the top right.
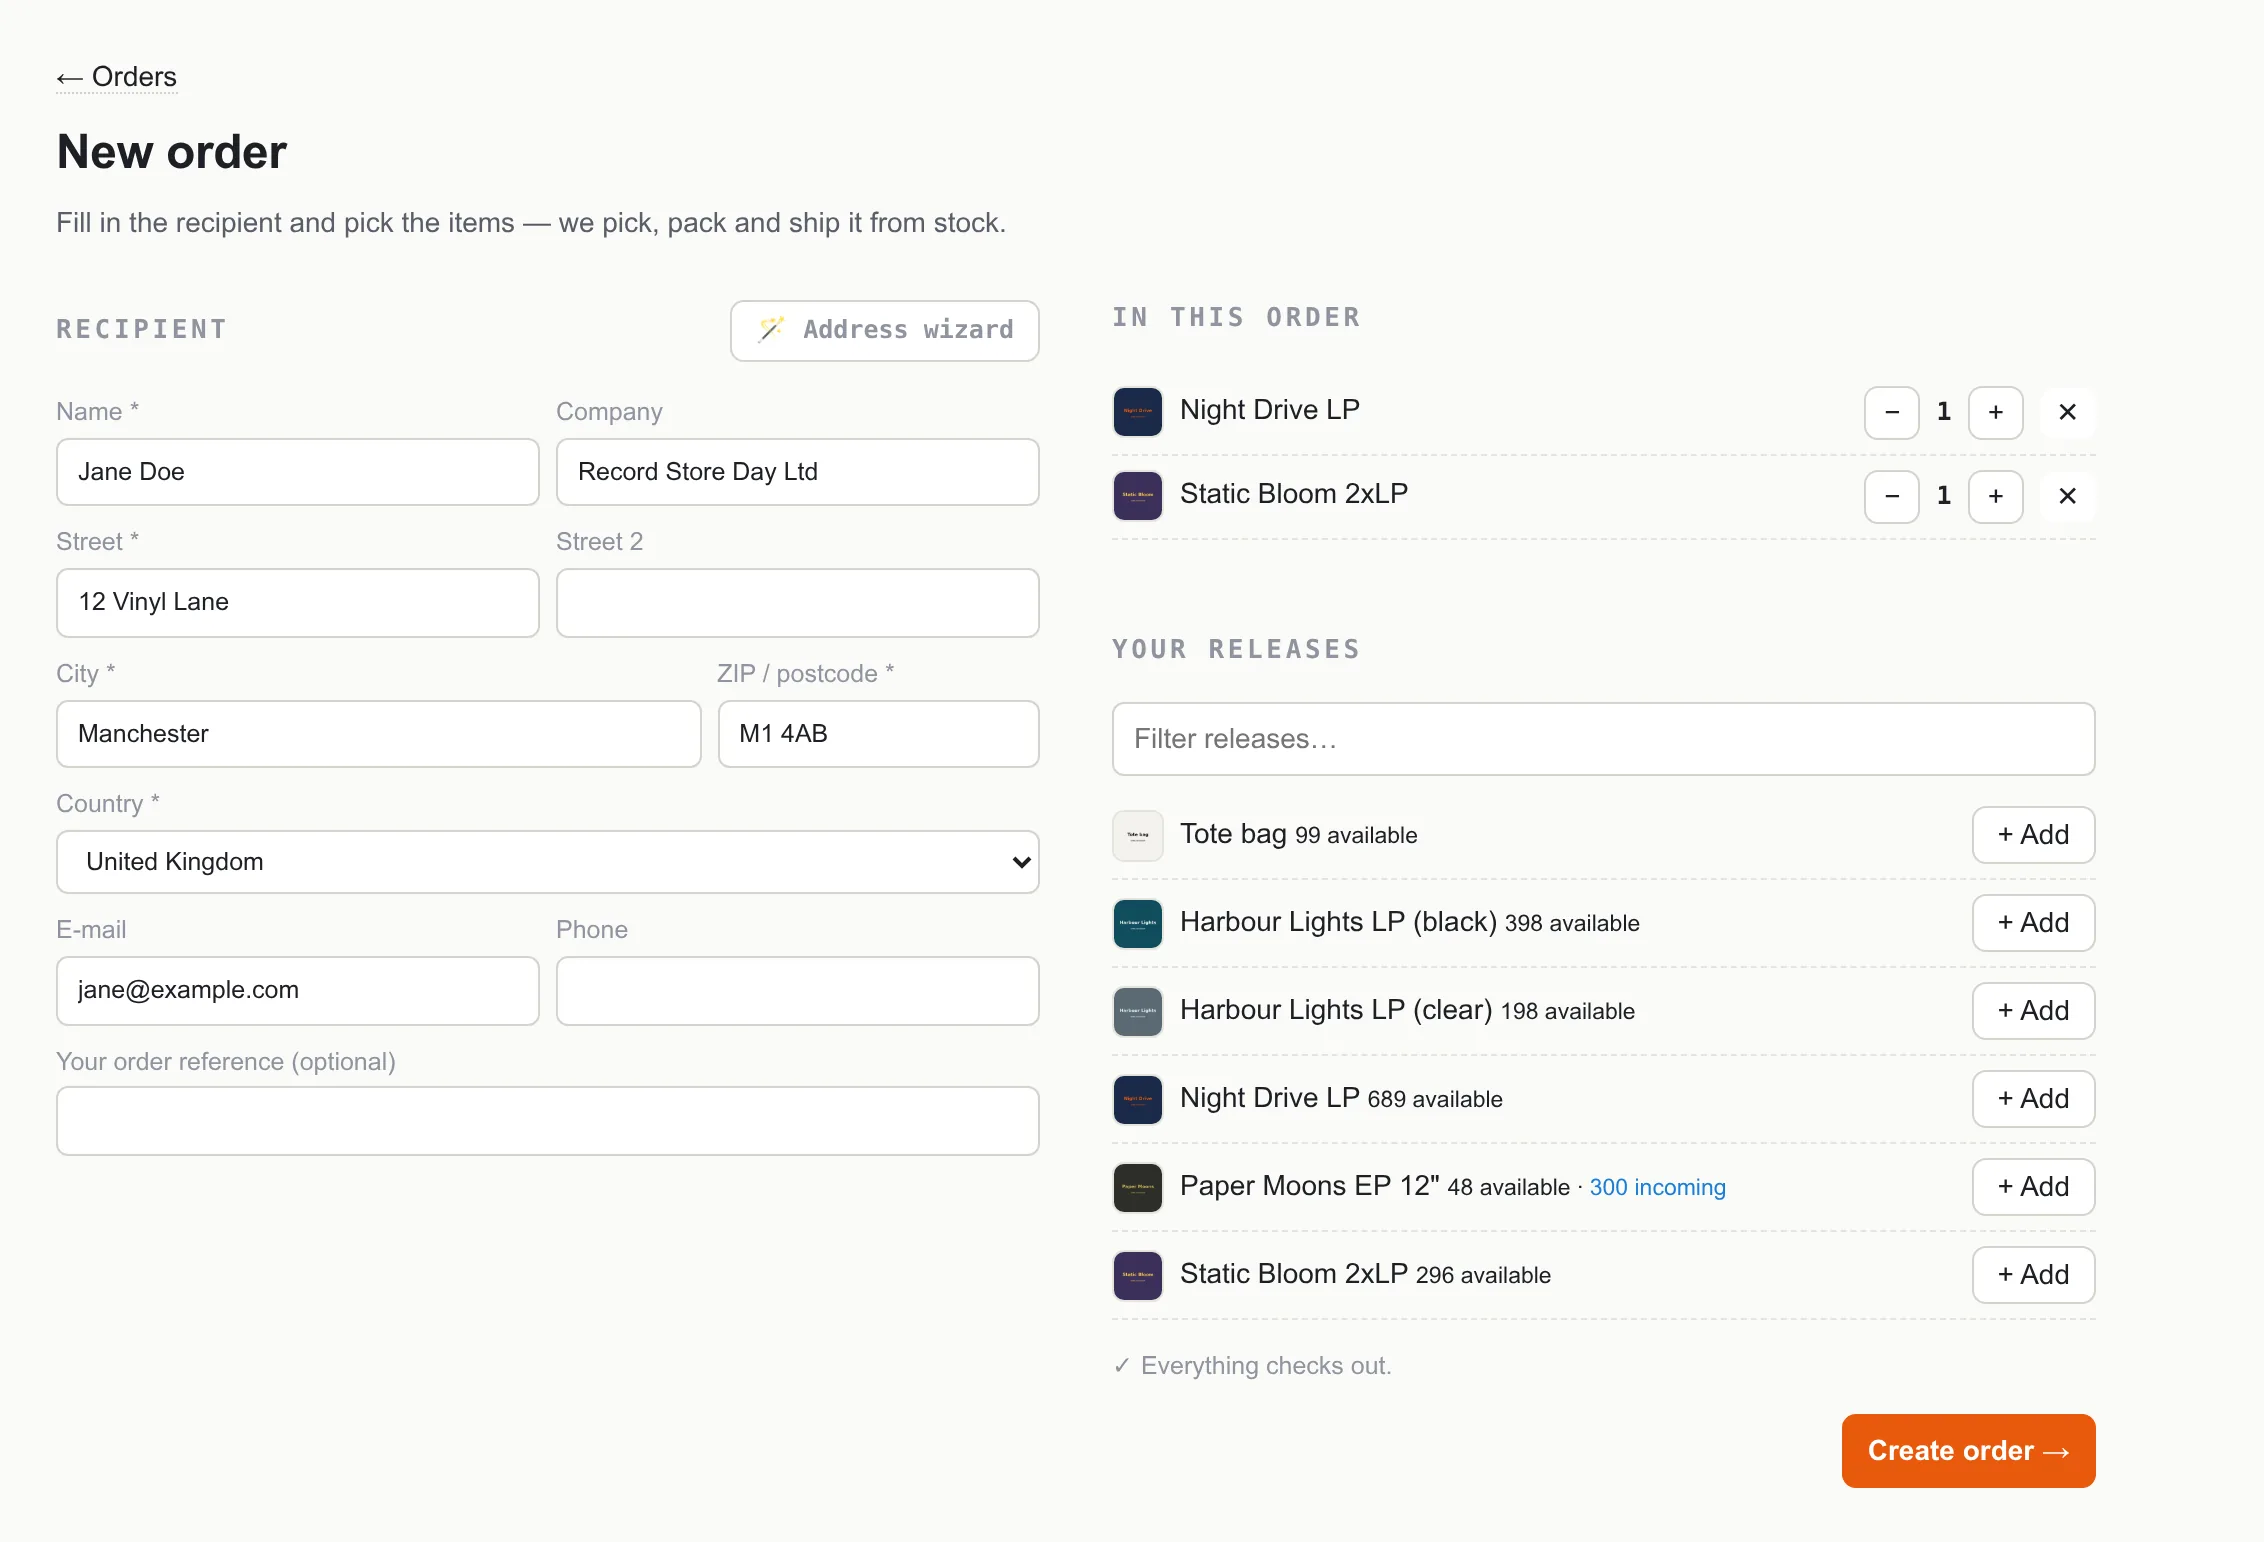
- Fill in the recipient on the left. Required: name, street, city, ZIP, country. Optional: company, a second address line, e-mail, phone and Your order reference (your own number; if you leave it empty we assign one).
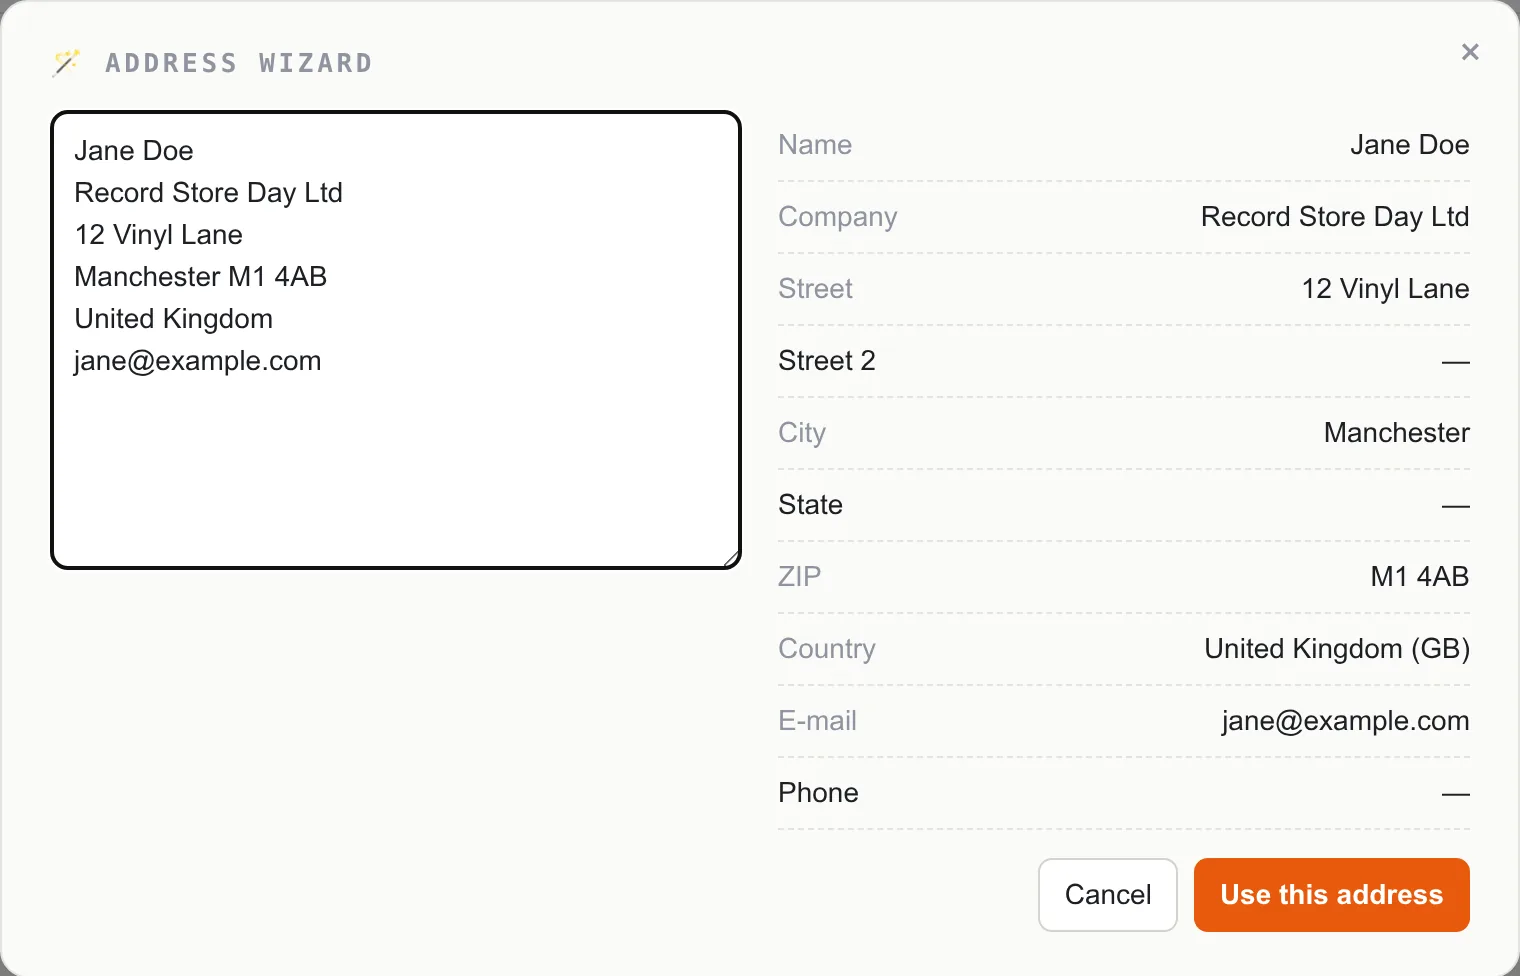
Faster: click 🪄 Address wizard, paste the address block exactly as your customer wrote it, check the preview on the right and click Use this address. The wizard fills the fields; correct anything it got wrong. - On the right, under Your releases, click + Add next to each release the order contains. Use the filter box to find a release by name. A release without free stock is greyed out and cannot be added; "300 incoming" next to a count means stock is announced but not yet received.
- Under In this order set the quantities with − and +; ✕ removes a line.
- Read the line above the button: "Everything checks out" means the form is complete; otherwise it lists what is missing. Click Create order →.
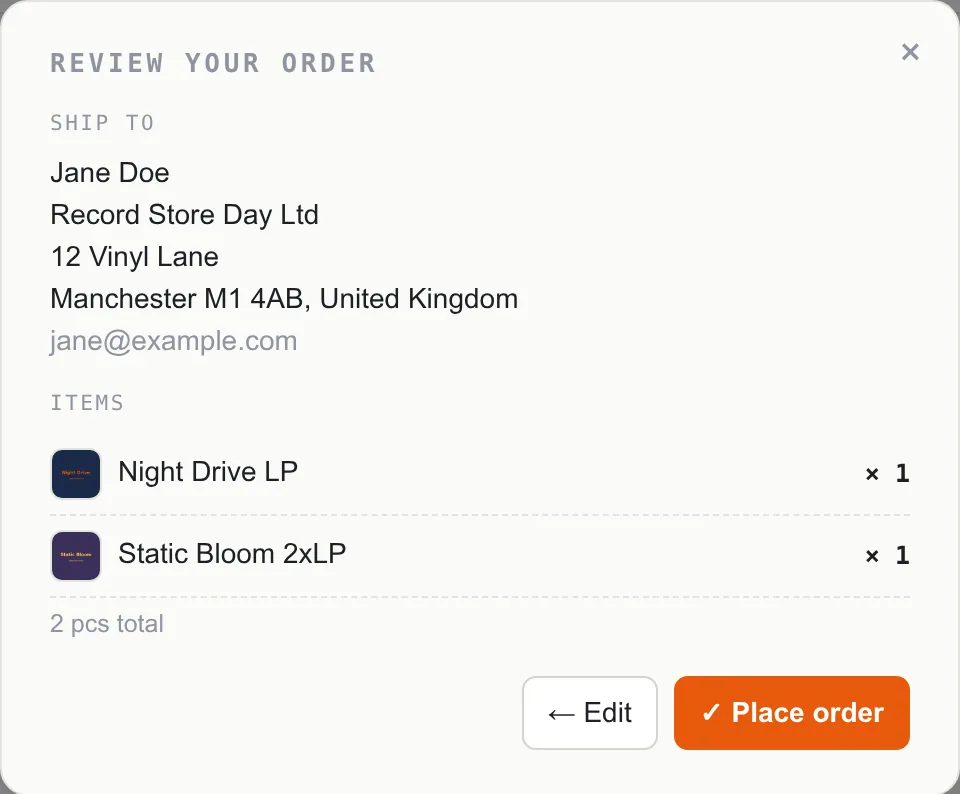
- Check the address and items in Review your order, then click ✓ Place order. ← Edit takes you back to the form.
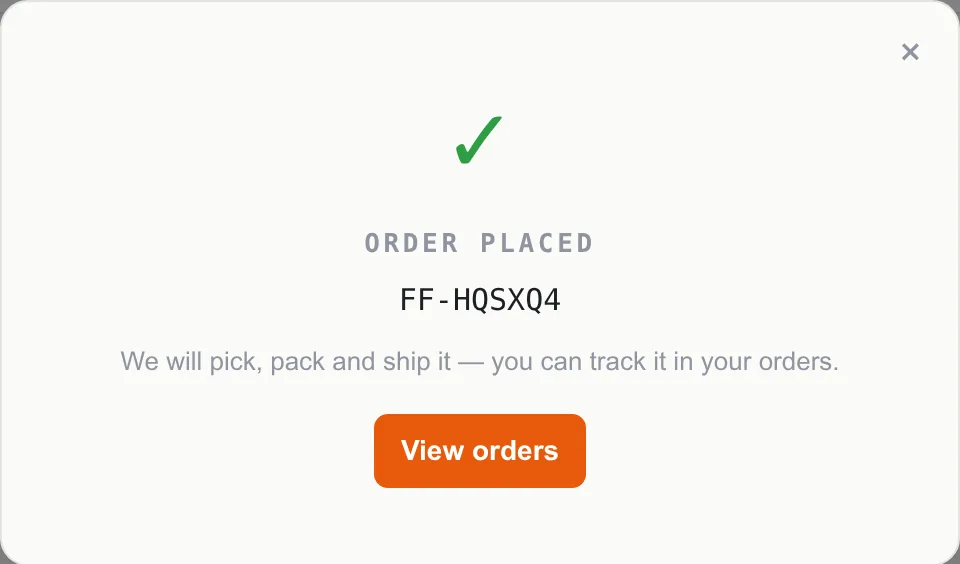
Result: the dialog shows "Order placed" with the ShipMyLPs number (FF-…). The order appears in the list, the stock is reserved, and it goes into the next packing batch. Until then you can edit the address or cancel it like any other order.
If the confirmation says the order needs a check on our side: the address did not pass our validation (for example a missing state for the US). We look at it and contact you if needed; you do not have to do anything now.
Upload orders from a file
For a batch of orders, for example a pre-order campaign exported from your store, upload a spreadsheet instead of typing them in. One row per order line; an order with two different releases takes two rows with the same order number.
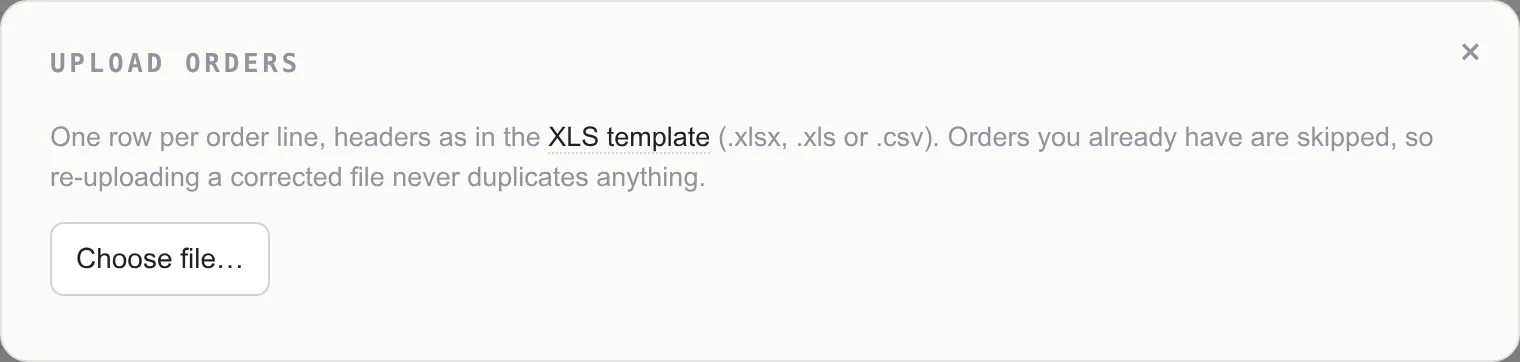
- Download the XLS template and fill it in, or use your store's export as long as the columns are named the same way (order number, name, street, city, ZIP, country, catalogue number, quantity; company, street 2, state, e-mail and phone are optional). Country is the two-letter code; common country names are recognised too.
- Open Orders and click ⬆ Upload orders, then Choose file… (.xlsx, .xls or .csv).
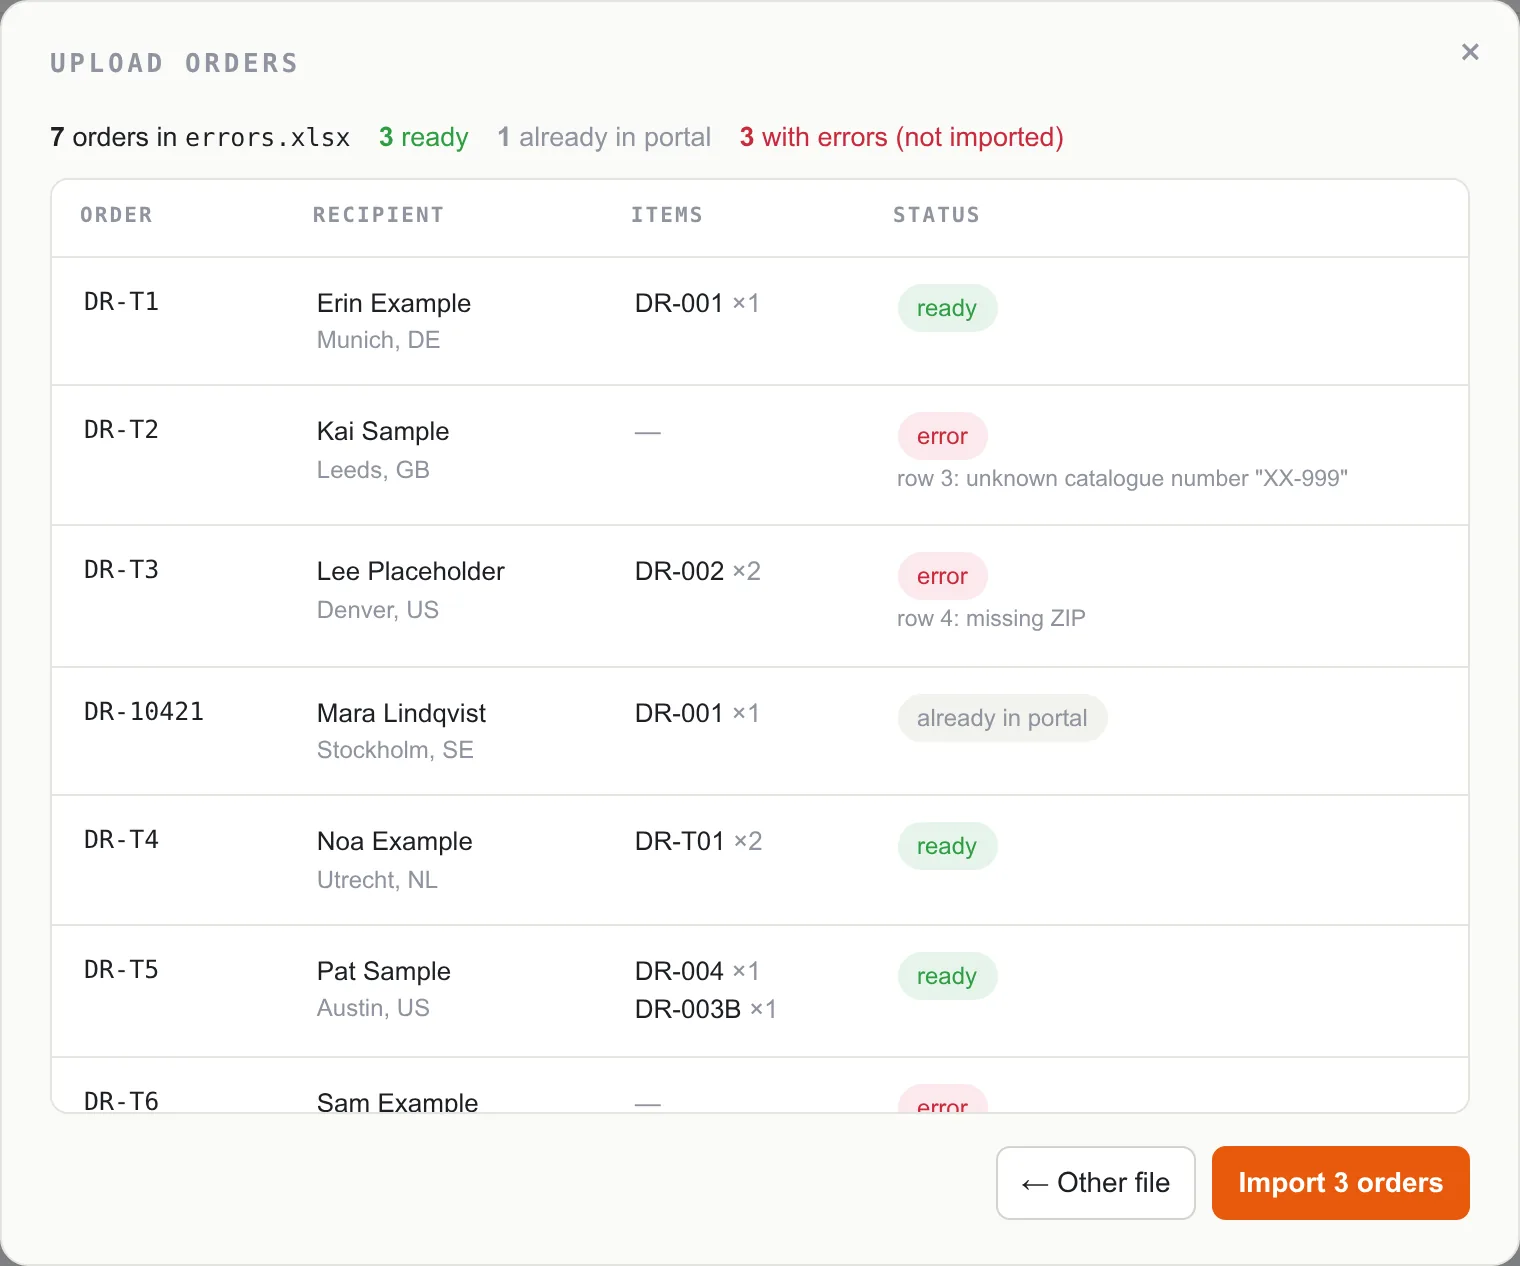
- Check the preview. Every order gets a status: ready will be imported; awaiting stock will be imported but waits for a delivery, because the file orders more of a release than we have available or announced (the yellow line above the table says how many); already in portal is skipped, the order number exists; error is skipped, the reason and the row number are shown next to it.
- Click Import N orders. Only ready and awaiting-stock orders are created.
- Fix the rows with errors in your file and upload it again. Orders already imported are recognised by their number and skipped, so nothing is created twice.
Result: the imported orders appear in the list and get their ShipMyLPs numbers; they go into the next packing batch like any other order. Orders whose address needs a check on our side are counted in the confirmation; we take those from here.
If the upload is refused with "Missing columns": the header row was not recognised. Rename the headers as in the template, or send us the file as it is and we import it for you.
5Inventory
Read the stock numbers
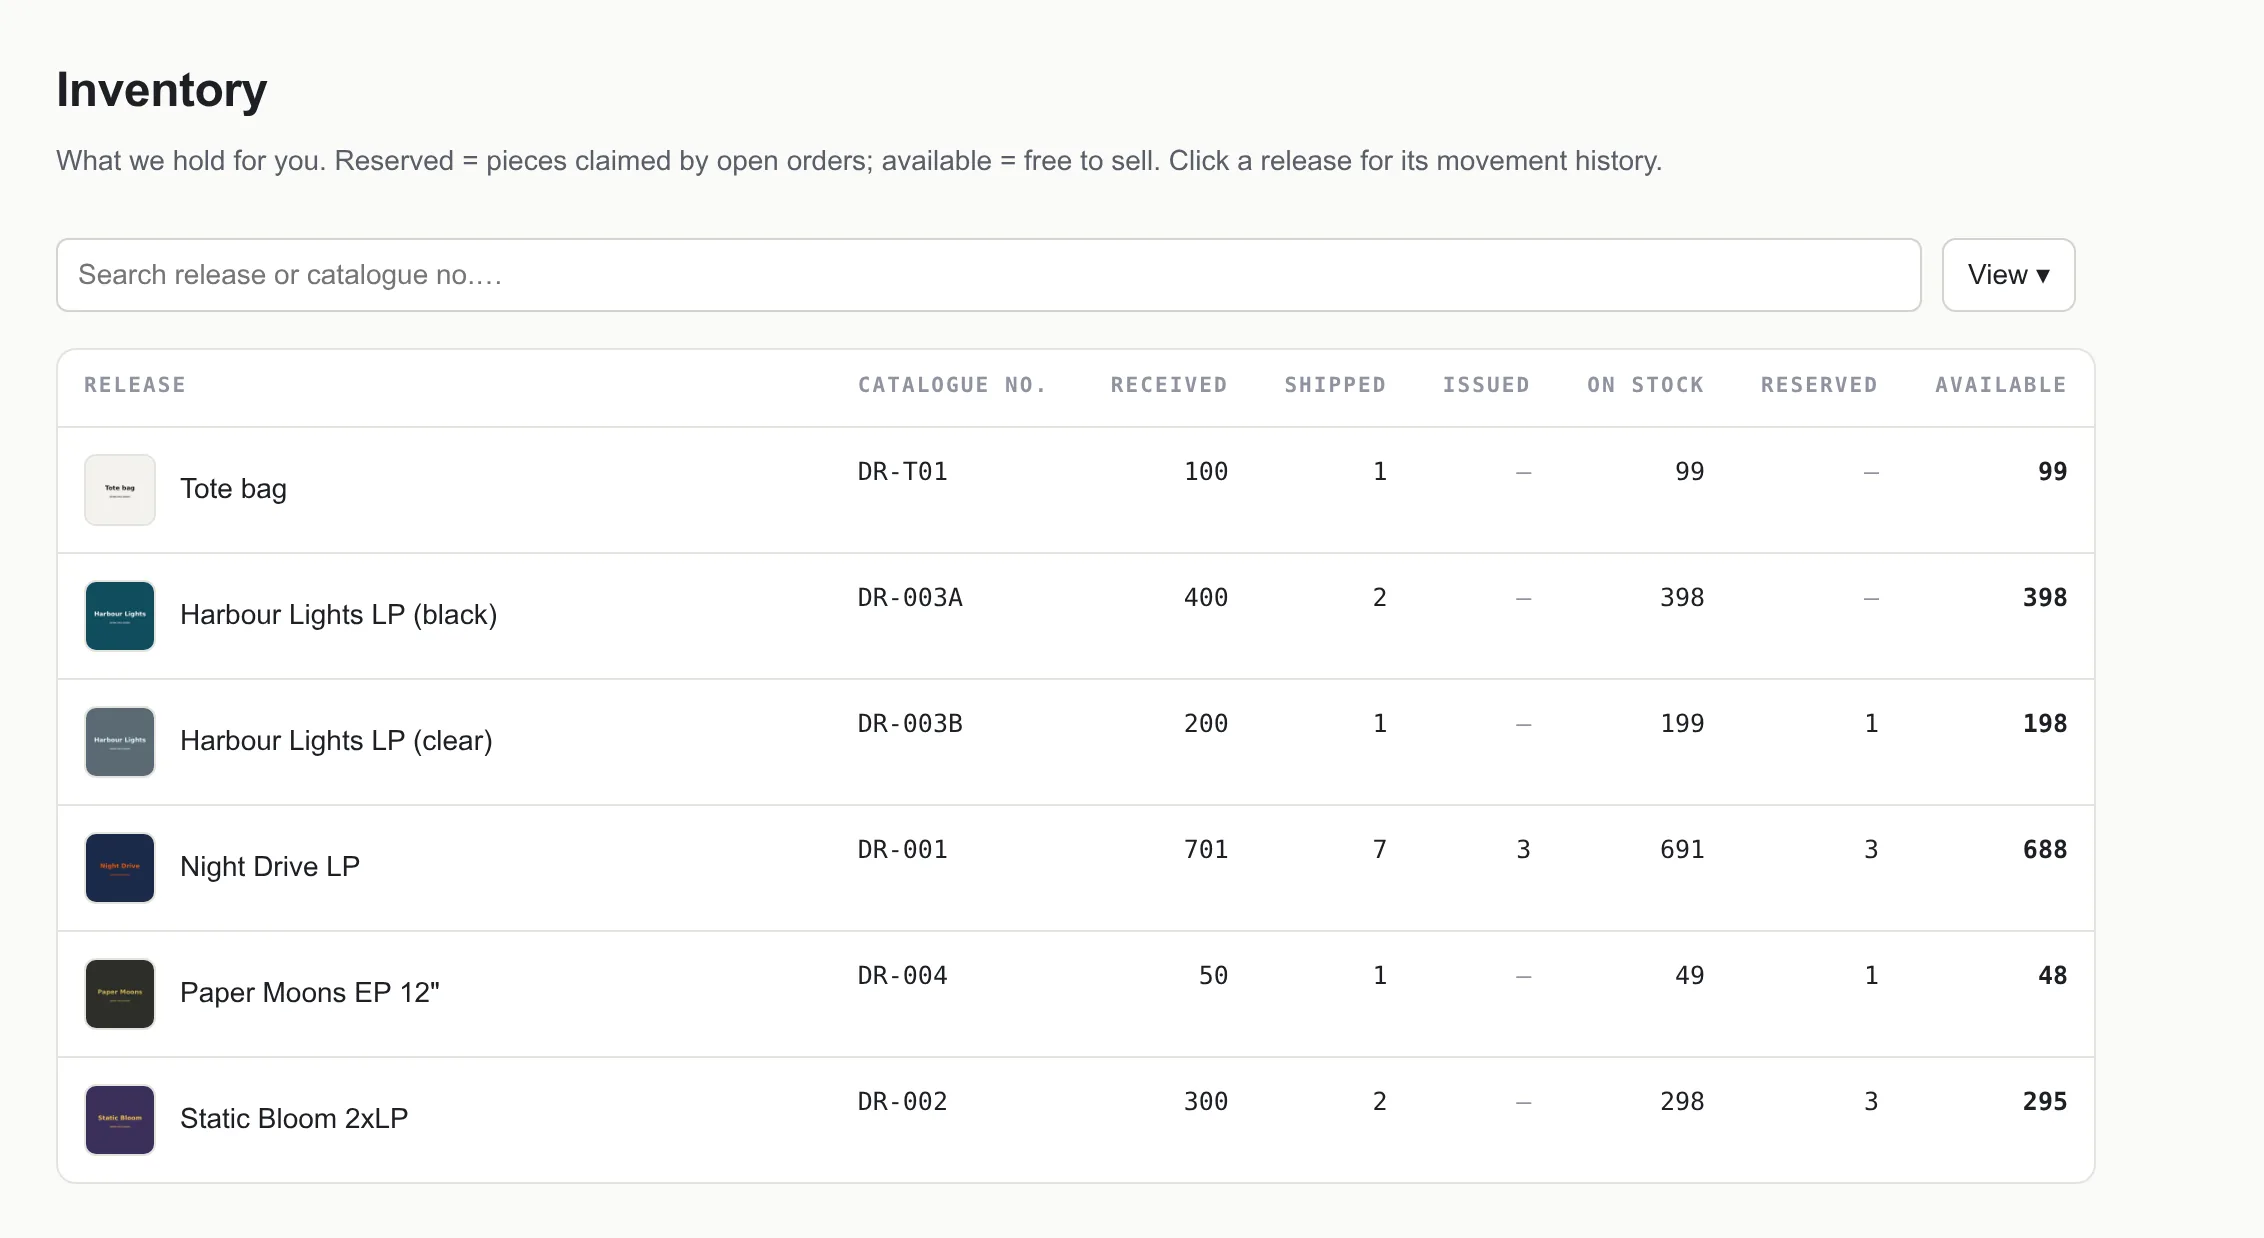
- Open Inventory. Each row is one release; the numbers are totals over both warehouses.
- Read Available first: that is what you can still sell today. It is On stock (pieces on the shelf) minus Reserved (pieces claimed by orders that have not shipped yet).
- Received is everything ever delivered to us for the release, Shipped everything that left in orders, Issued pieces handed out otherwise (promo copies, samples).
- A row highlighted in red has more reserved than on stock: orders are waiting for a delivery. Announce the stock or cancel the orders.
Check one release's history
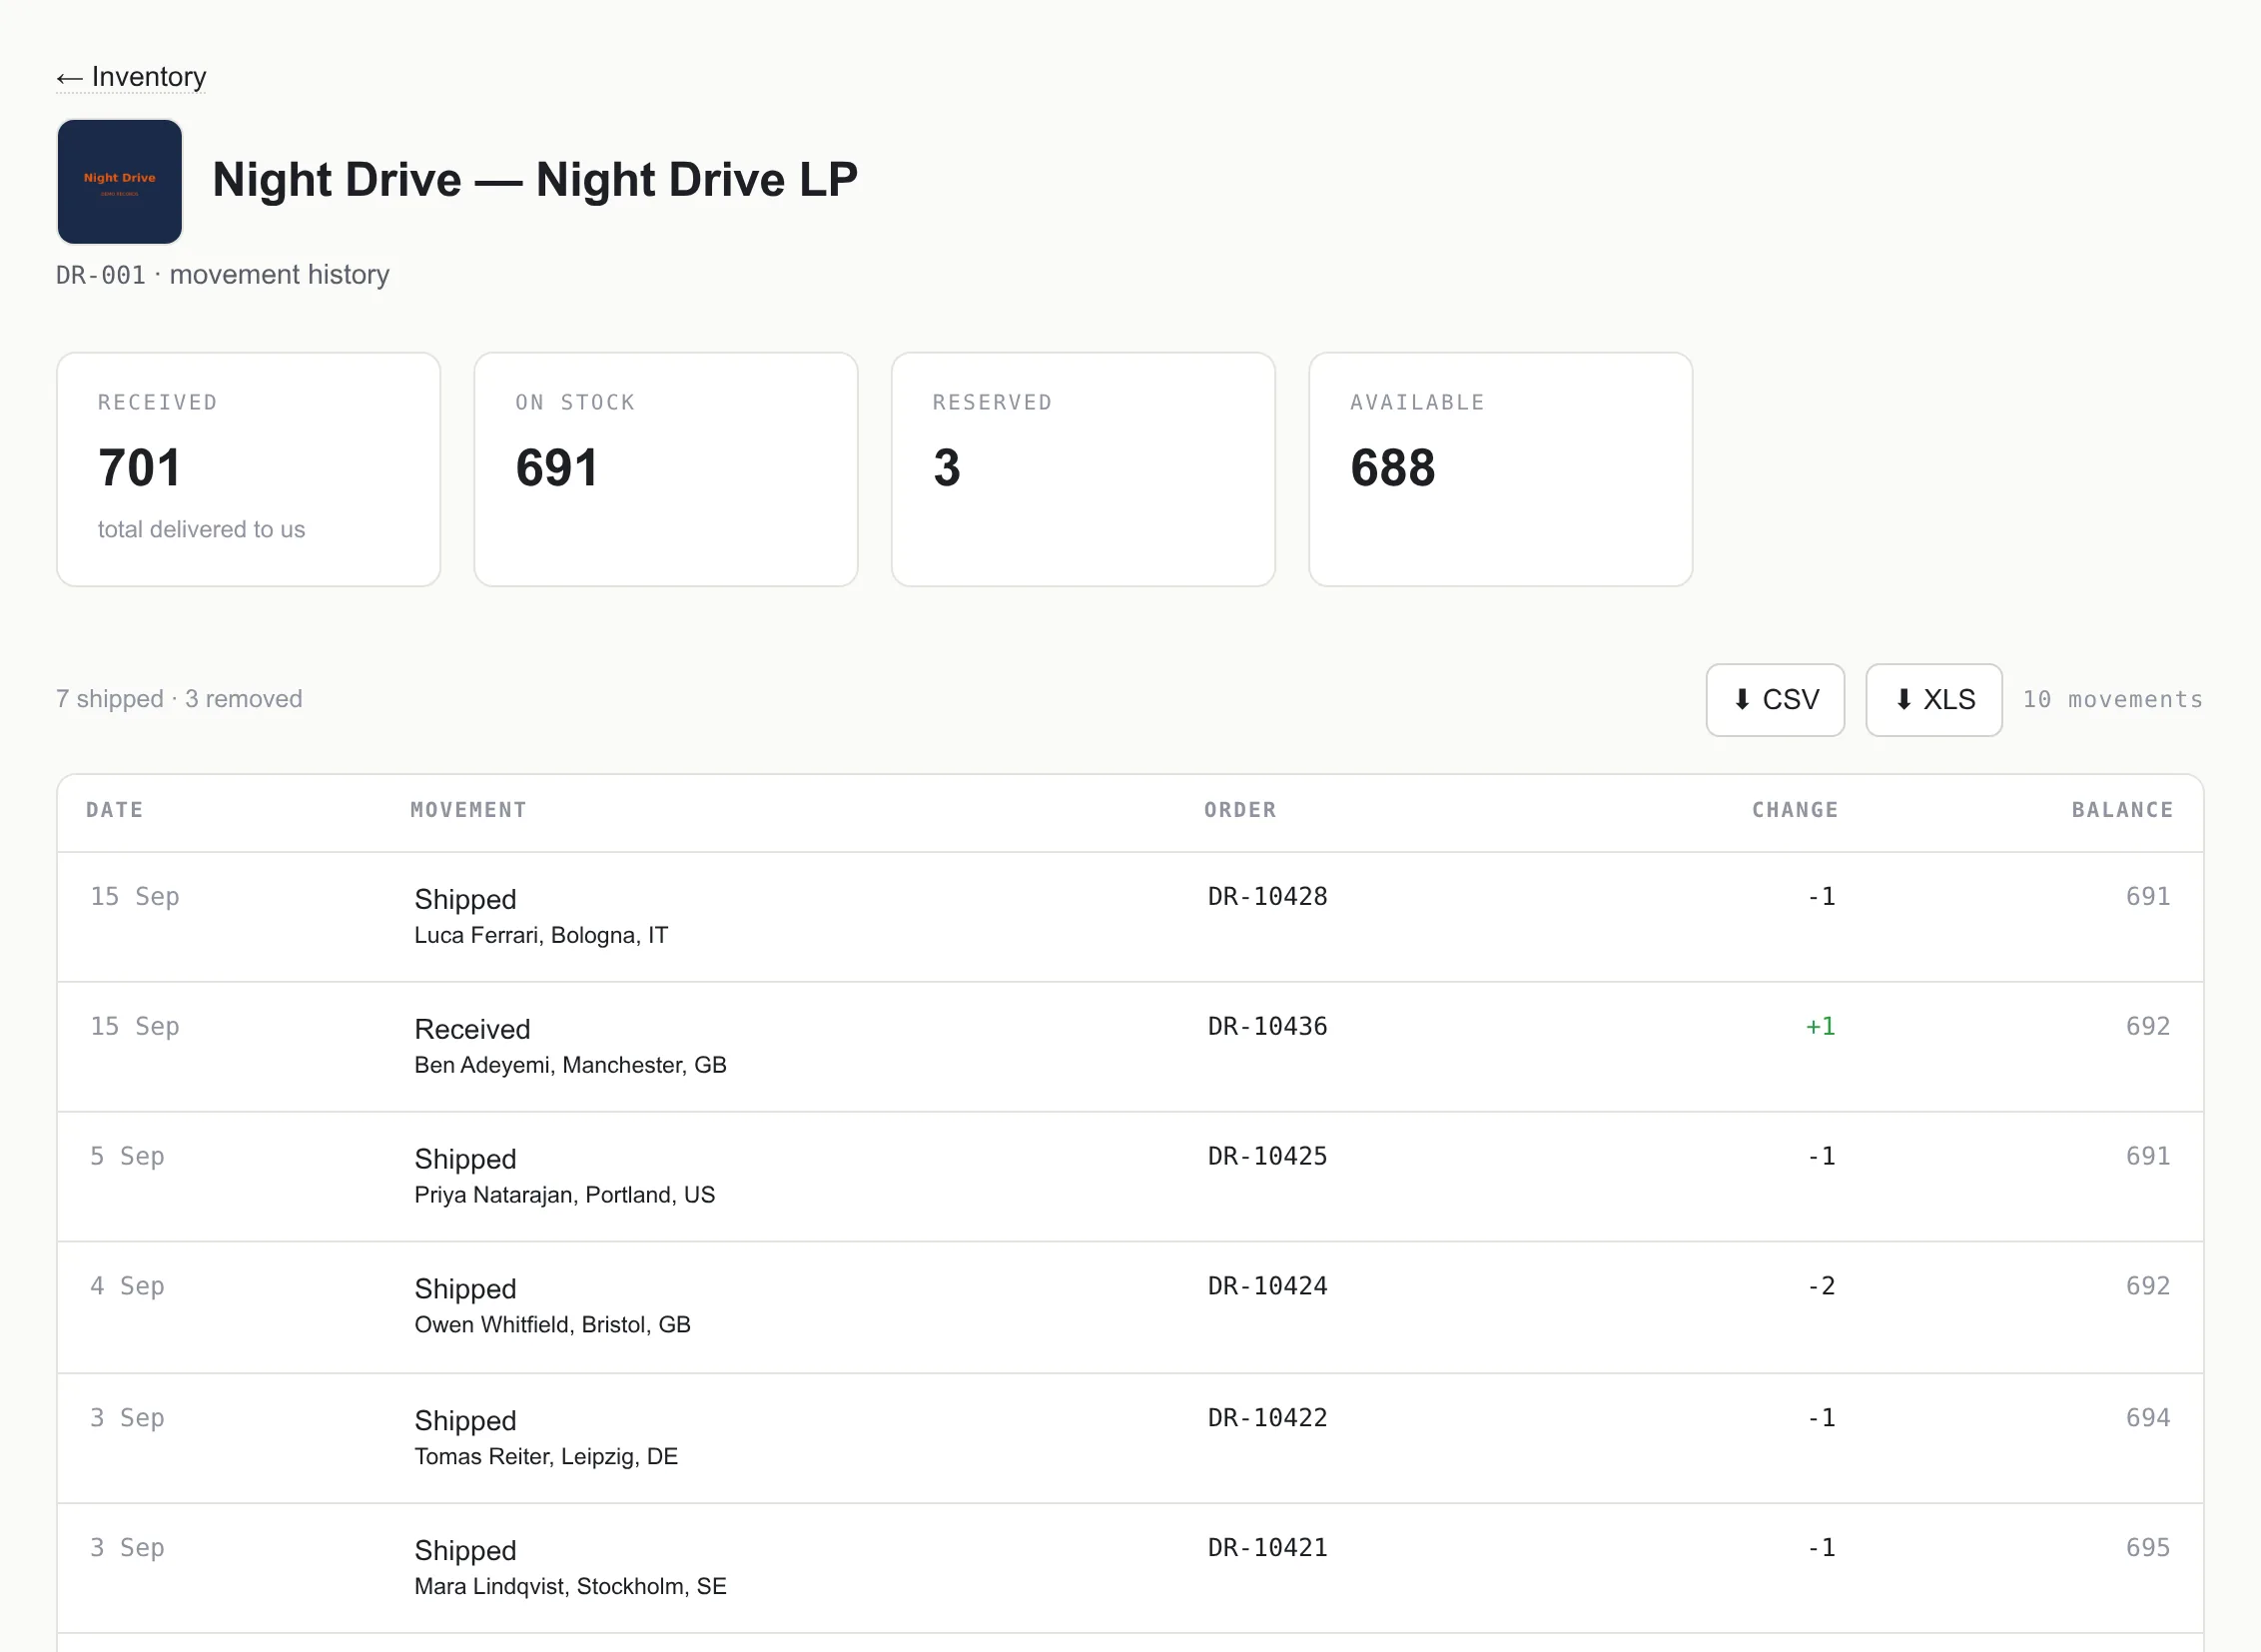
- Click the release row.
- The four cards on top repeat the totals for this release. Below them, the movement history lists every receipt, shipment, return and write-off, newest first, with the order number, the change and the running balance.
- Stock announced but not yet received is listed above the history as "on its way to us" with the expected date.
- Click Show all movements ↓ if the list is cut after 25 rows. ⬇ CSV and ⬇ XLS download the whole history, useful for your own stock take.
- ← Inventory at the top returns to the table.
Show or hide columns and archived releases
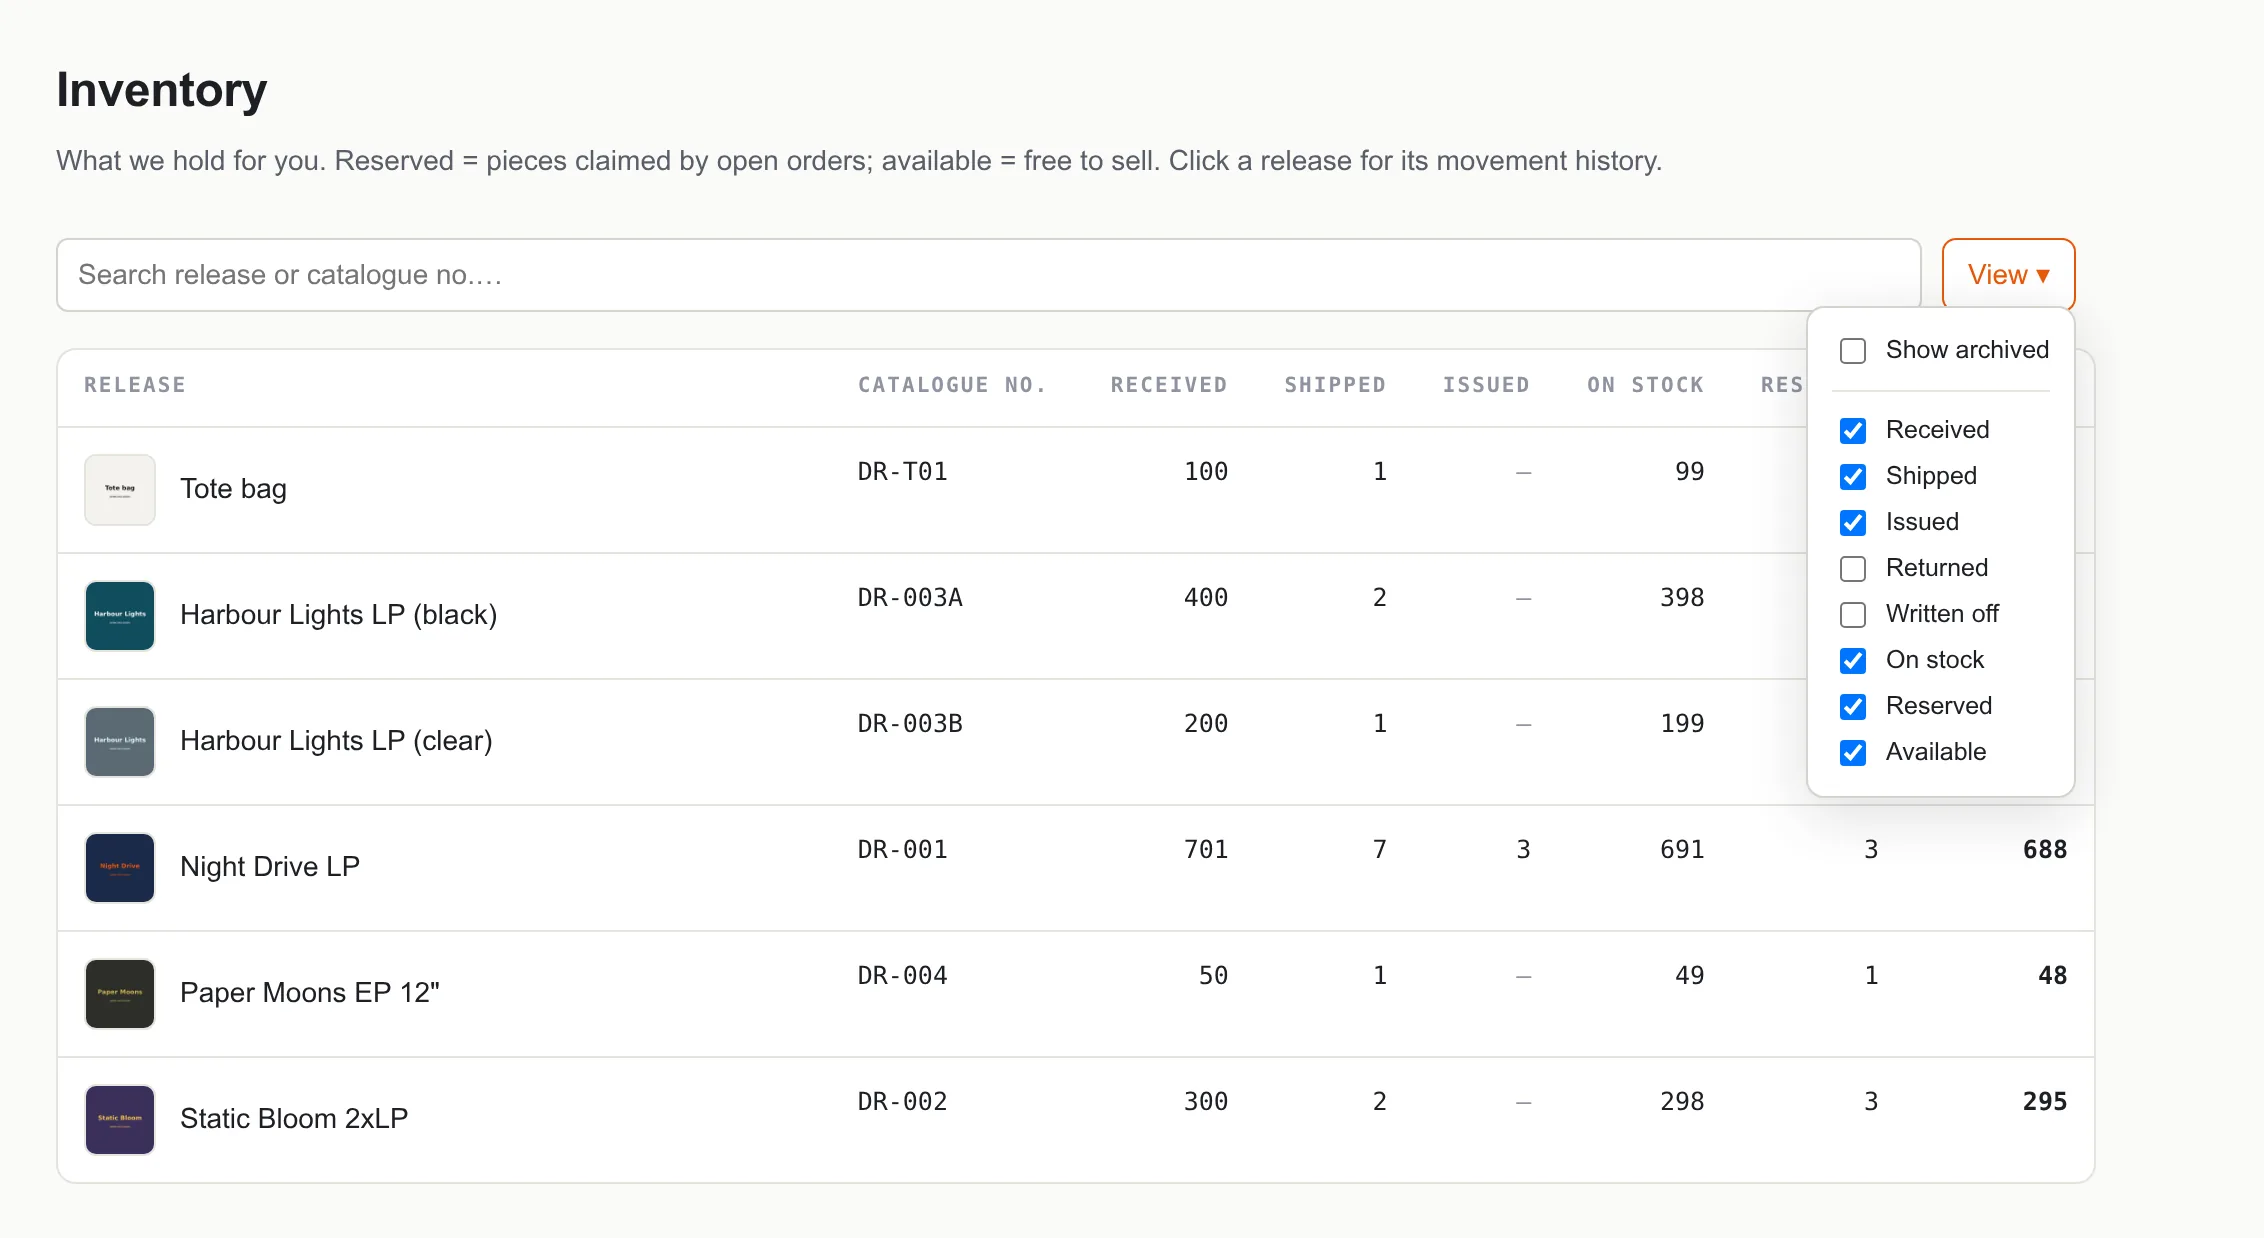
- Click View ▾ above the table.
- Tick the columns you want (Received, Shipped, Issued, Returned, Written off, On stock, Reserved, Available). The choice is remembered on that device.
- Tick Show archived to include releases we archived at your request (sold out, deleted from your catalogue).
- Type in the search box to find a release by name or catalogue number.
6Announce inbound stock
Every delivery to our warehouses is announced in advance: a pressing from the plant, boxes you send yourself, a return from a distributor. The announcement tells us what to expect and produces the box labels with our exact receiving address. At intake we count the delivery against it and record any difference.
Three ways to get stock to us
- Pressed at XVINYLX: nothing to announce. The records go from the press to our shelf, we book them in and they appear in your Inventory. You get an e-mail when they are in.
- By e-mail: forward the plant's packing list or write us what is coming (release, catalogue number, quantity, expected date, who ships it) to . We create the announcement for you; it then shows in your Inbound tab like any other, with the box labels ready to download.
- In the portal: the four-step form below. Worth it when you ship to us regularly and want the box labels and the intake result in your own hands without waiting for us.
Announce a shipment from the plant
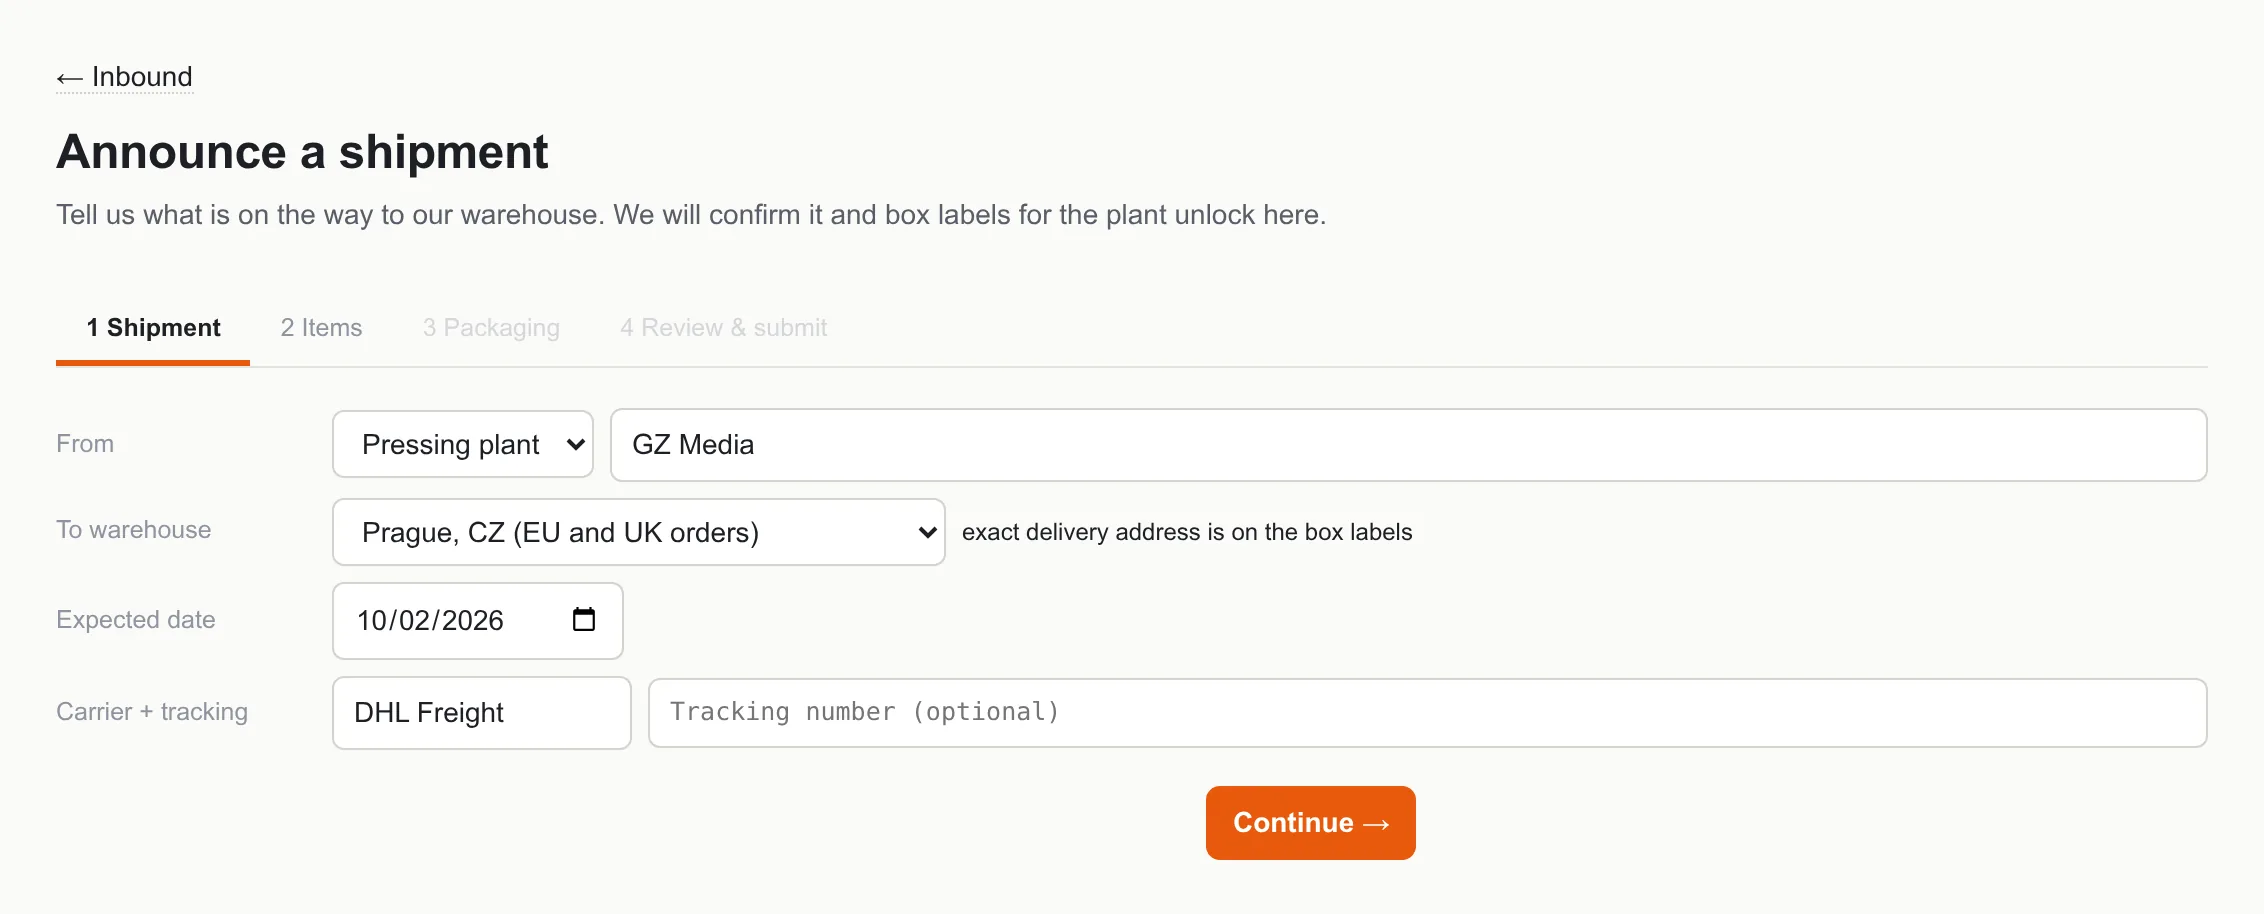
- Open Inbound and click + Announce a shipment. A draft is created and saves itself after every step; you can leave and come back through continue editing → on the Inbound tab.
- Step 1, Shipment. Choose Pressing plant in From and type the plant's name. Choose the warehouse in To warehouse: Prague for EU and UK orders, Portland for US and Canada orders. Fill in the Expected date; carrier and tracking are optional, add them when the plant sends them. Click Continue →.
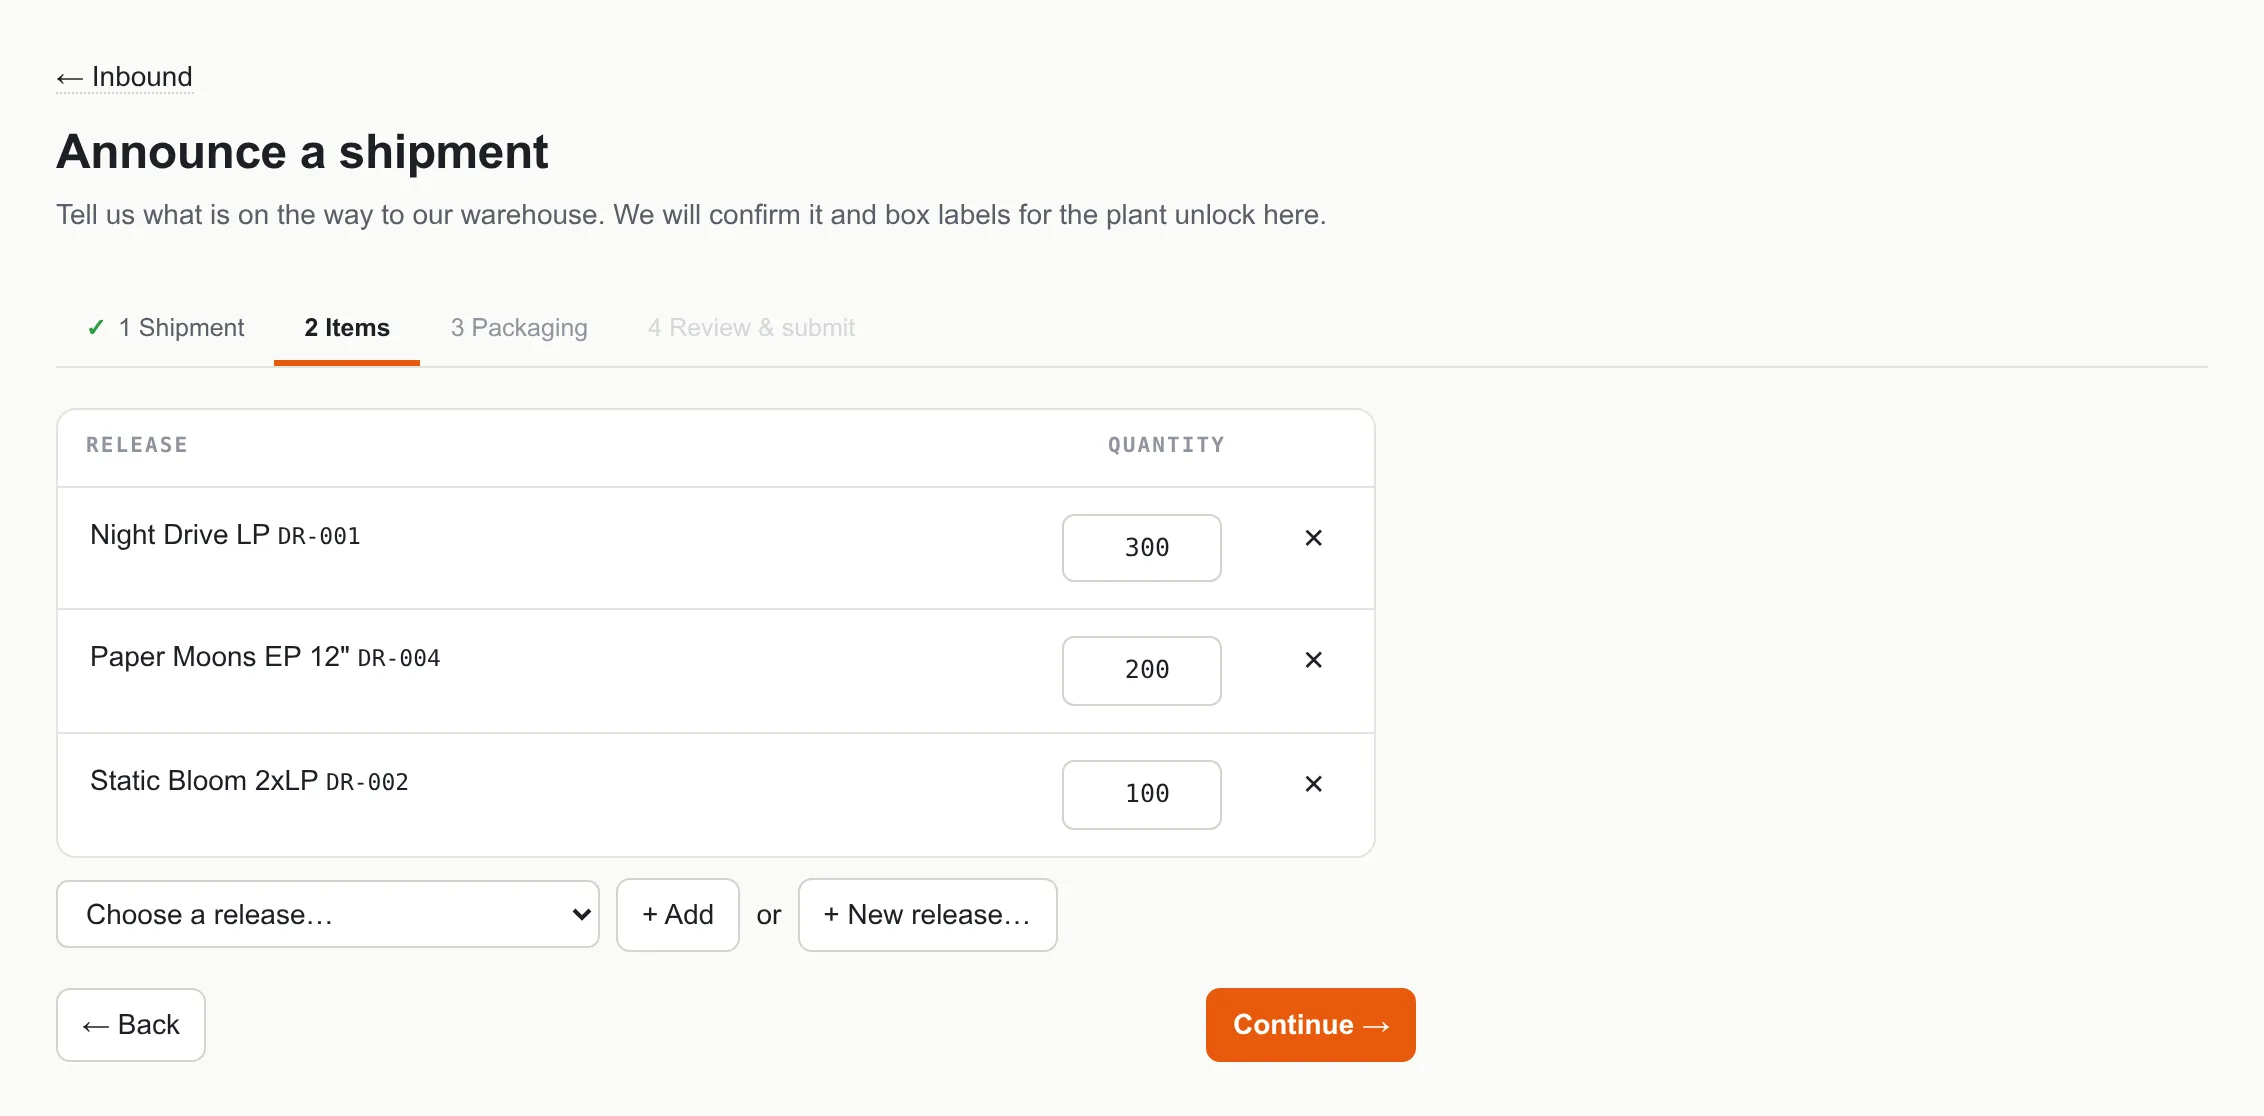
- Step 2, Items. For every release in the delivery: pick it in Choose a release…, click + Add and type the Quantity. A release we do not know yet: see Add a release we do not know yet. Click Continue →.
- Step 3, Packaging. Declare how the delivery is packed: see Declare pallets and boxes. The step is complete when the green line says all pieces are assigned. Click Continue →.
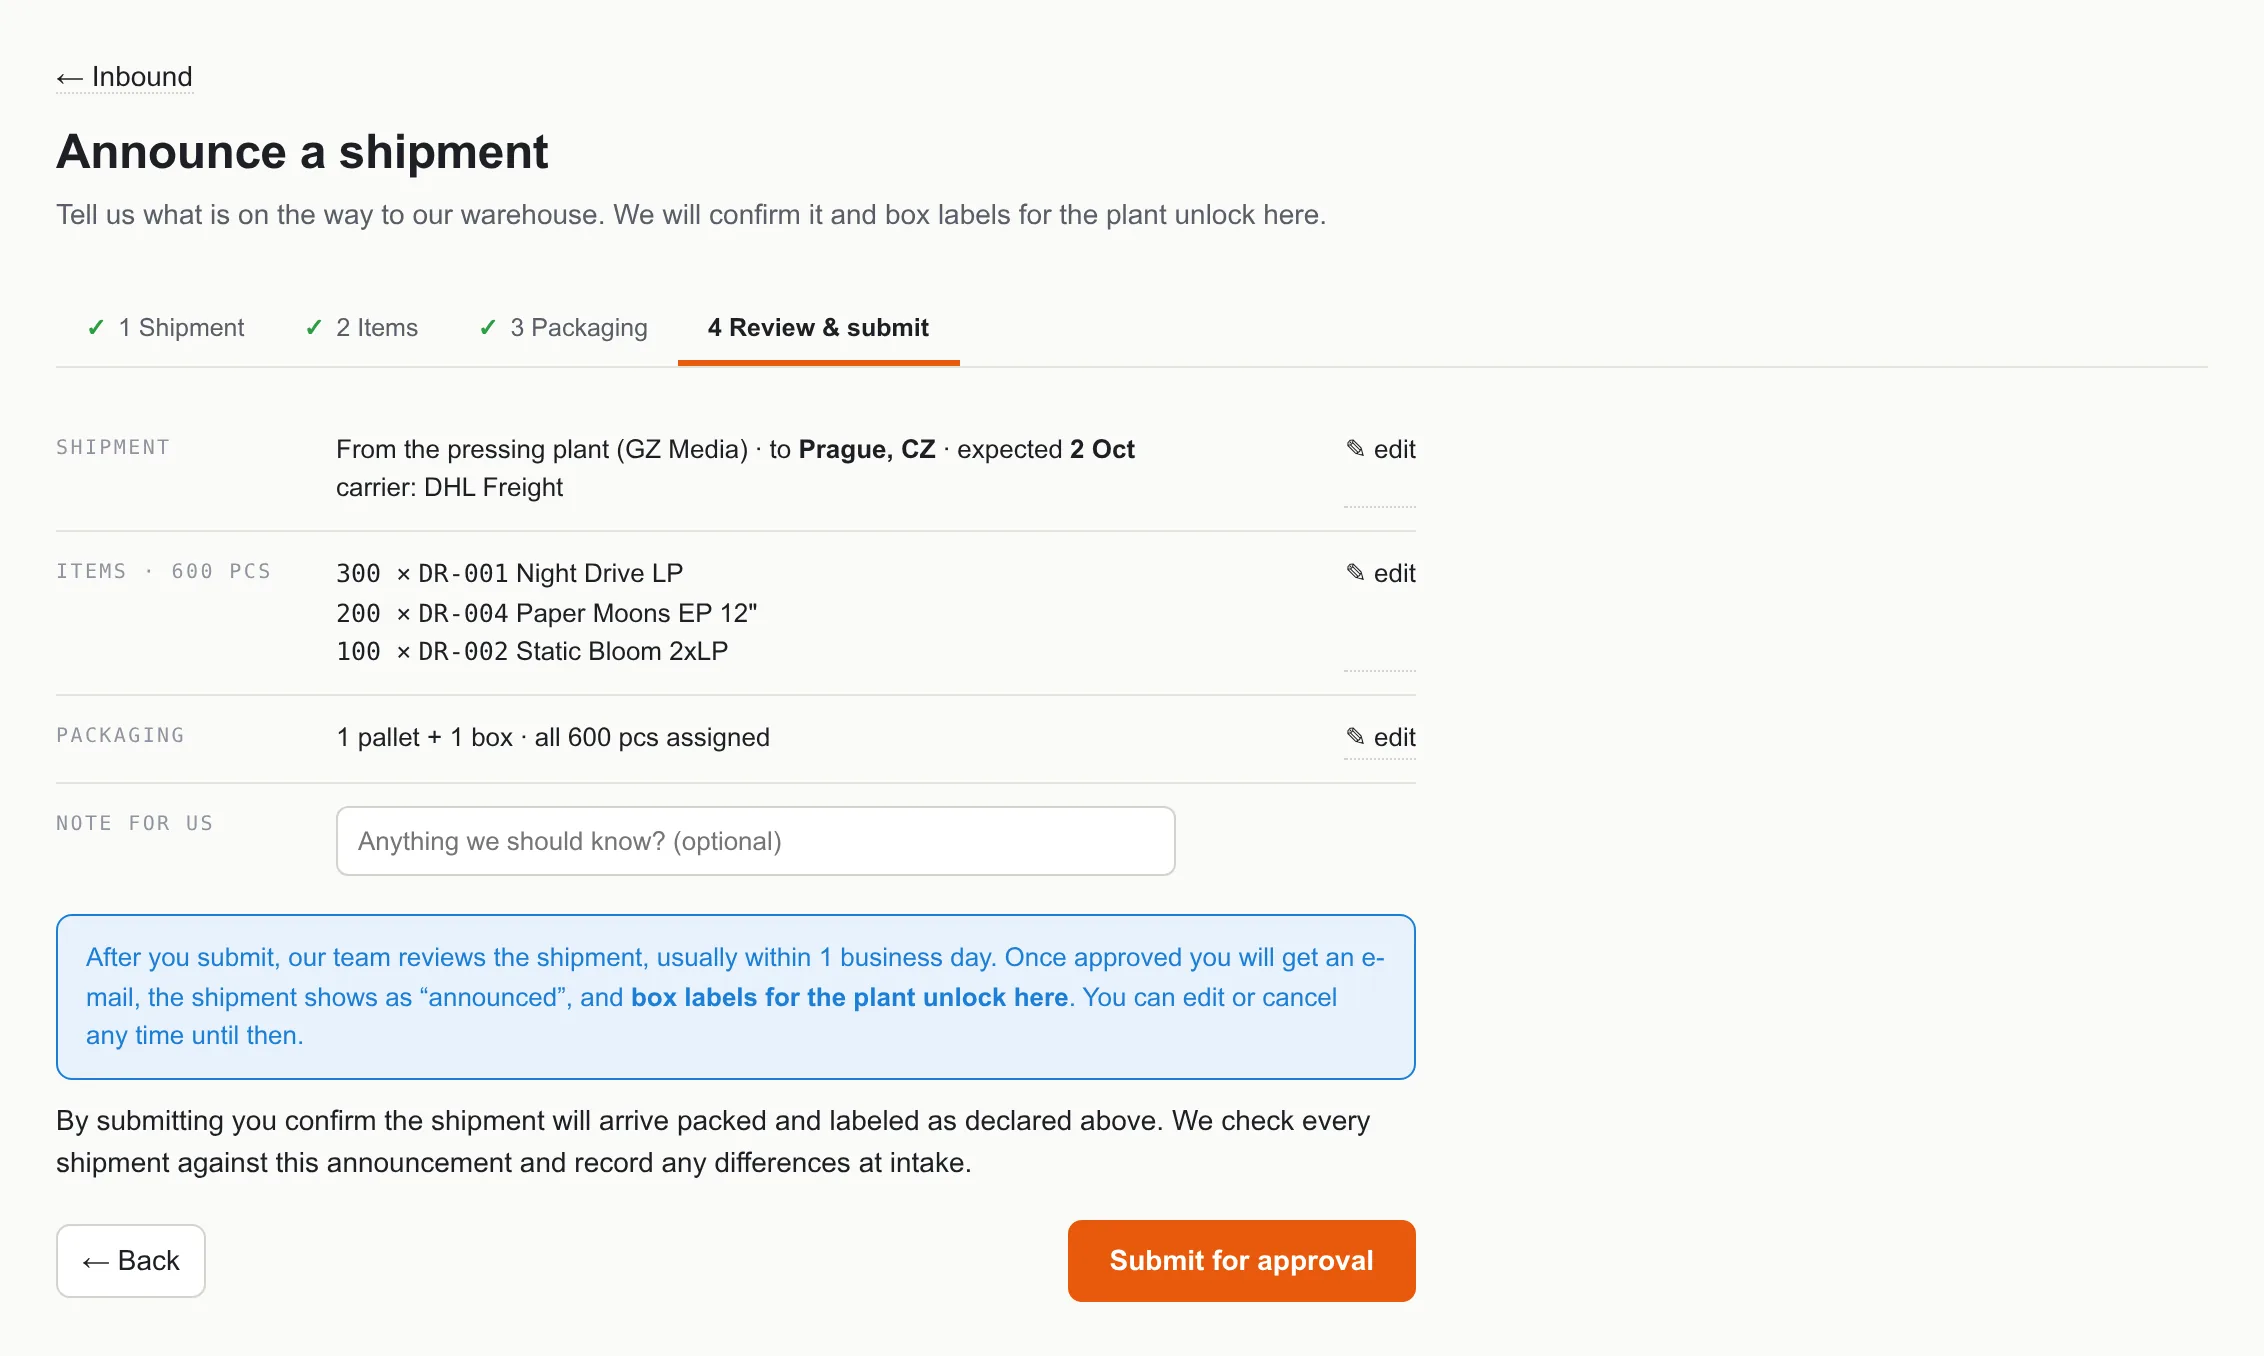
- Step 4, Review & submit. Check the summary; ✎ edit next to a block takes you back to that step. Add a Note for us if there is anything unusual (split delivery, fragile packaging, a deadline). Click Submit for approval.
Result: the shipment shows waiting for approval on the Inbound tab and the Dashboard. We check it, usually within one business day, and you get the e-mail "Inbound shipment IN-… approved". From then on the status is announced and the box labels can be downloaded (see below).
If the e-mail says "needs changes": open the shipment, read our note in the yellow box, correct the announcement and submit it again.
Announce boxes you send yourself
Same procedure as above with two differences:
- In step 1 choose From you (or Other for a distributor or another sender) and type where the boxes come from.
- After approval, download the box labels and stick one on each box before handing them to the carrier. Boxes without our label are hard to match to your announcement at intake.
Add a release we do not know yet
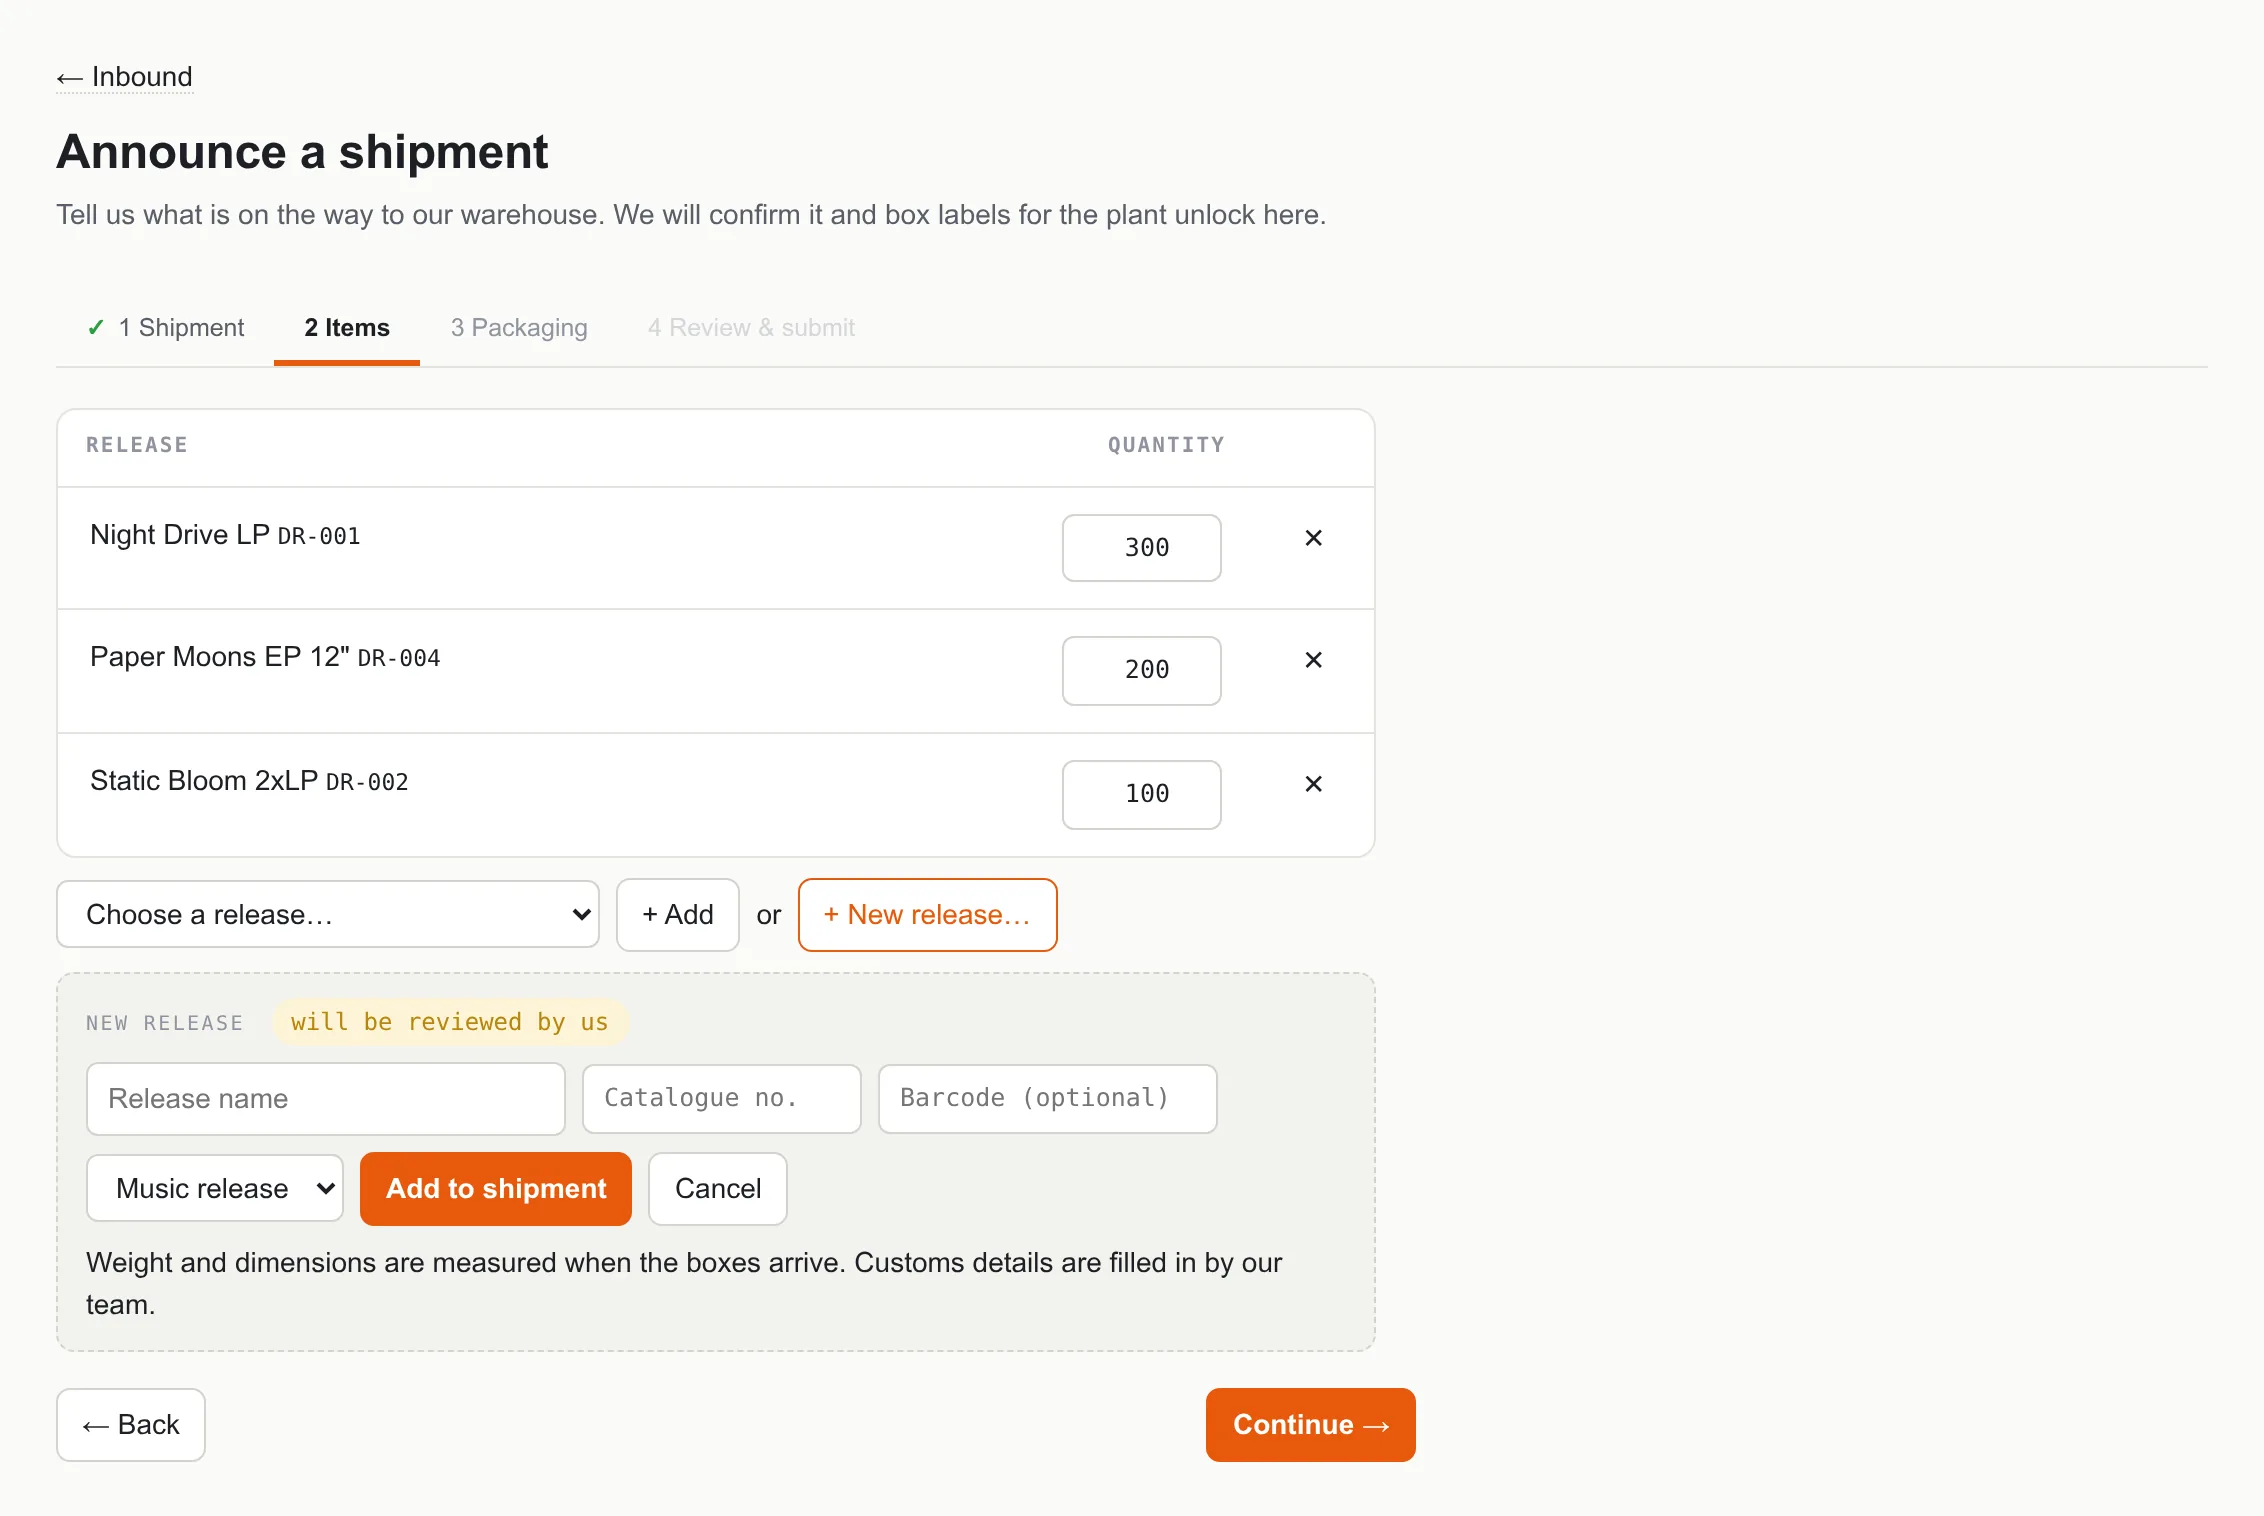
- In step 2, Items, click + New release….
- Type the Release name as it should appear in the portal and on packing lists, the Catalogue no. (the number you will use as SKU in your store) and, if you have it, the barcode. Choose the type: Music release, Merch or Other.
- Click Add to shipment and type the quantity like for any other release.
Result: the release is marked "new · we will review" until we approve the shipment. We add weight, dimensions and customs details ourselves once the boxes arrive.
Declare pallets and boxes
Step 3 asks how the delivery is packed. Use the plant's packing list; the plant or sender must then pack and label the delivery exactly as declared.
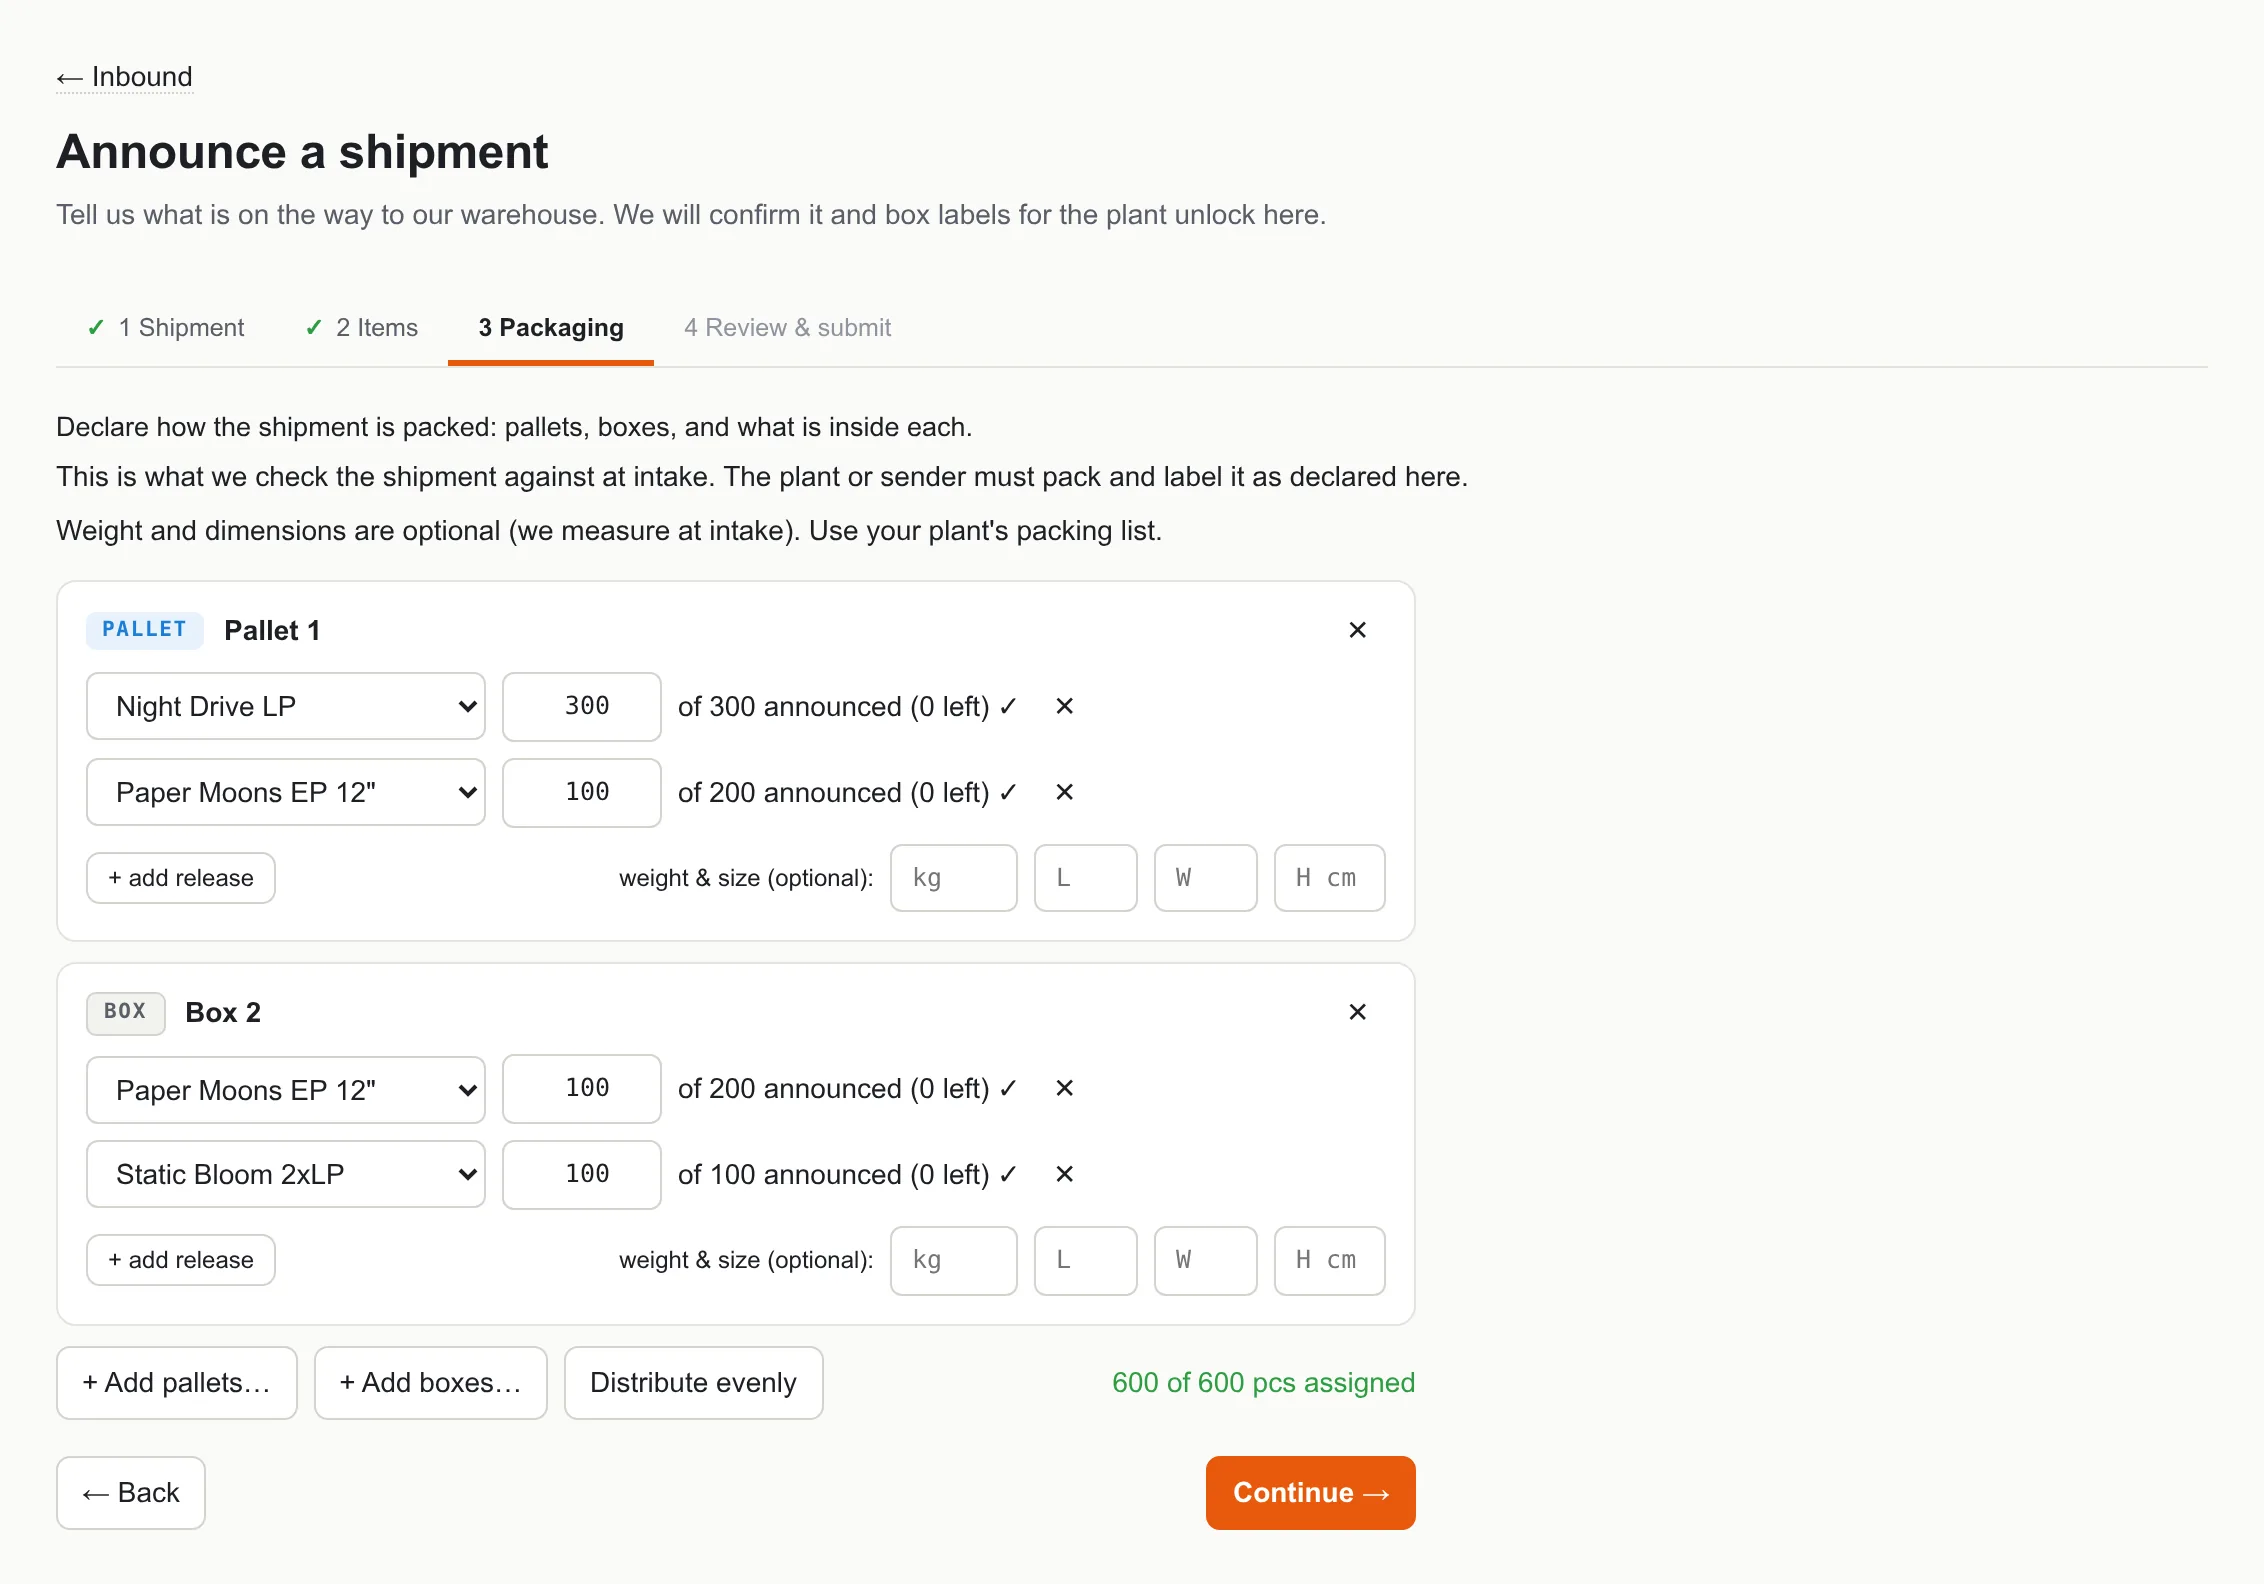
- Click + Add pallets… or + Add boxes… and type how many. Each pallet or box becomes a card.
- In each card, pick the release in Release… and type how many pieces of it are in that pallet or box. + add release adds a second release to the same card (mixed pallets). The text next to the quantity shows how many pieces of that release are still unassigned.
- Shortcut for identical boxes: add all boxes first, then click Distribute evenly. The pieces of every release are split equally across the cards; adjust by hand where the last box is short.
- Weight and size per card are optional; we measure at intake.
- The step is complete when the line at the bottom says "N of N pcs assigned" in green.
Withdraw and edit a submitted announcement
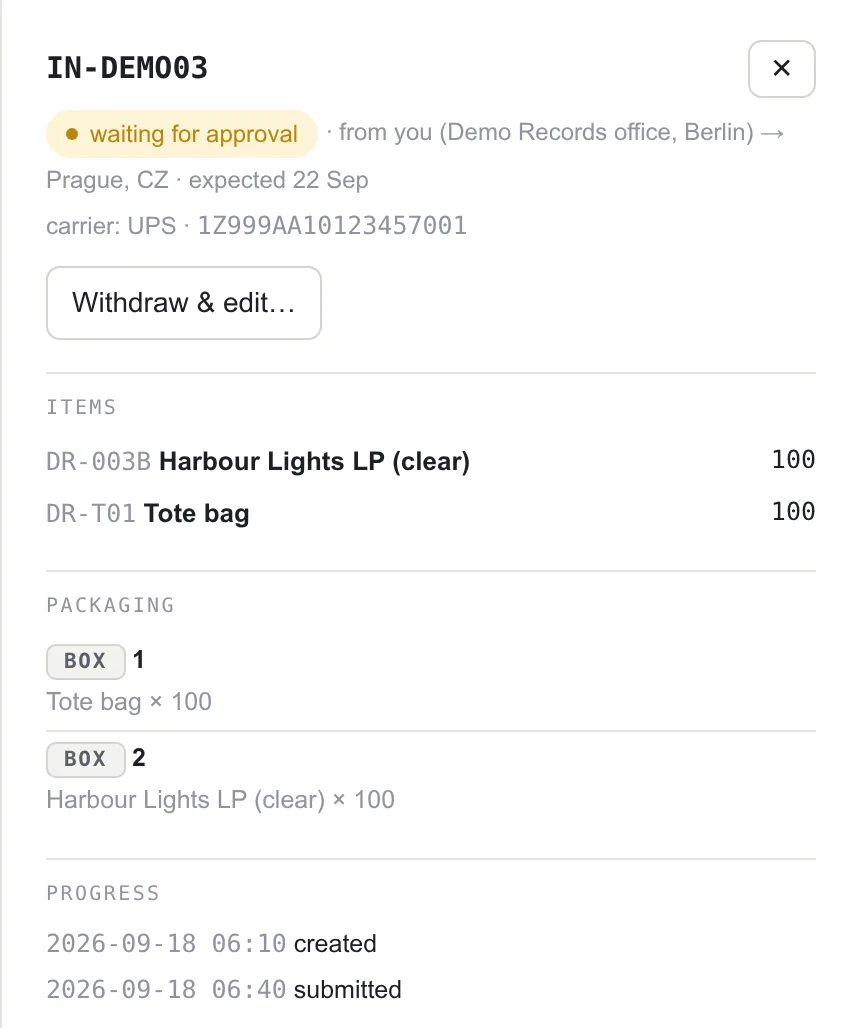
- Open Inbound and click the shipment that says waiting for approval.
- Click Withdraw & edit… and confirm. The shipment becomes a draft again.
- Change what you need and click Submit for approval again.
If the button is not there: the shipment is already approved. E-mail with the shipment code and the change; we adjust it or return it to you for editing.
Download and use the box labels
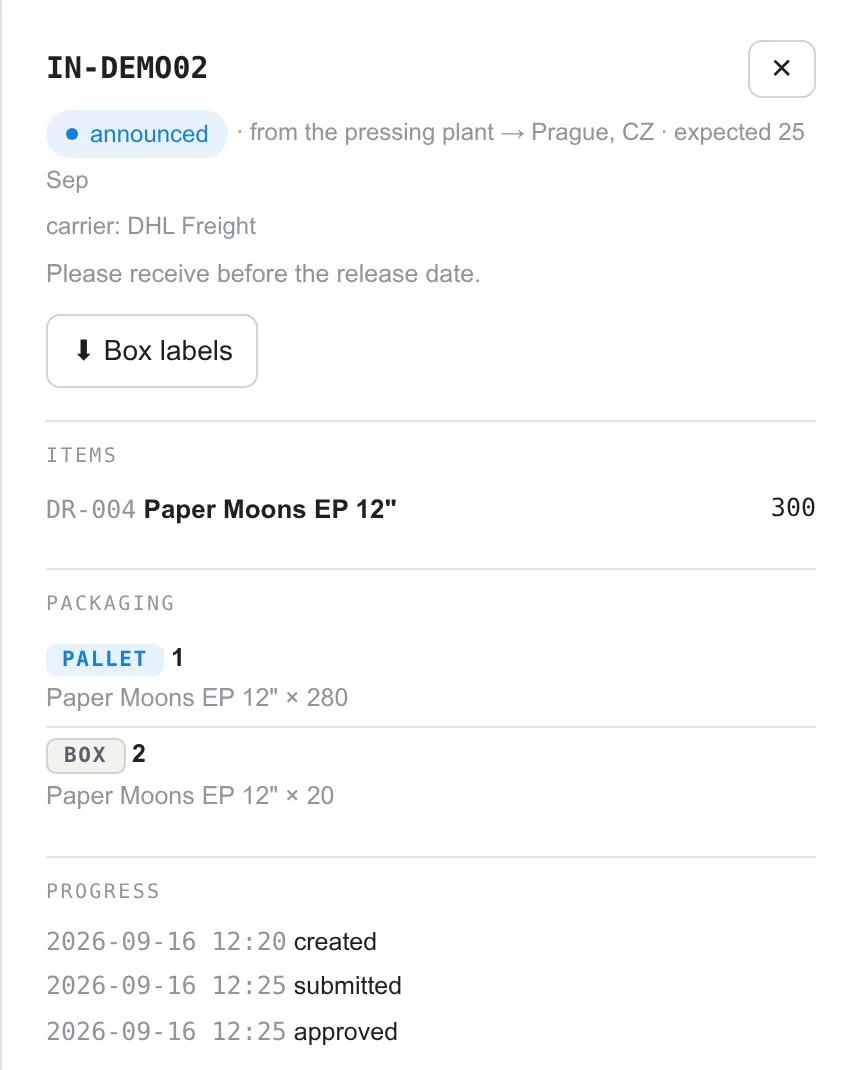
- Open the shipment that says announced (Inbound tab, or the ⬇ box labels link on the Dashboard row).
- Click ⬇ Box labels. A PDF downloads with one label (105 × 148 mm, A6) per pallet or box: the shipment code, the pallet or box number, its declared contents and our receiving address.
- Send the PDF to the plant with the instruction to print it and attach one label per pallet or box, or print and attach them yourself. Number 1 goes on pallet 1 as declared, and so on.
Read the intake result
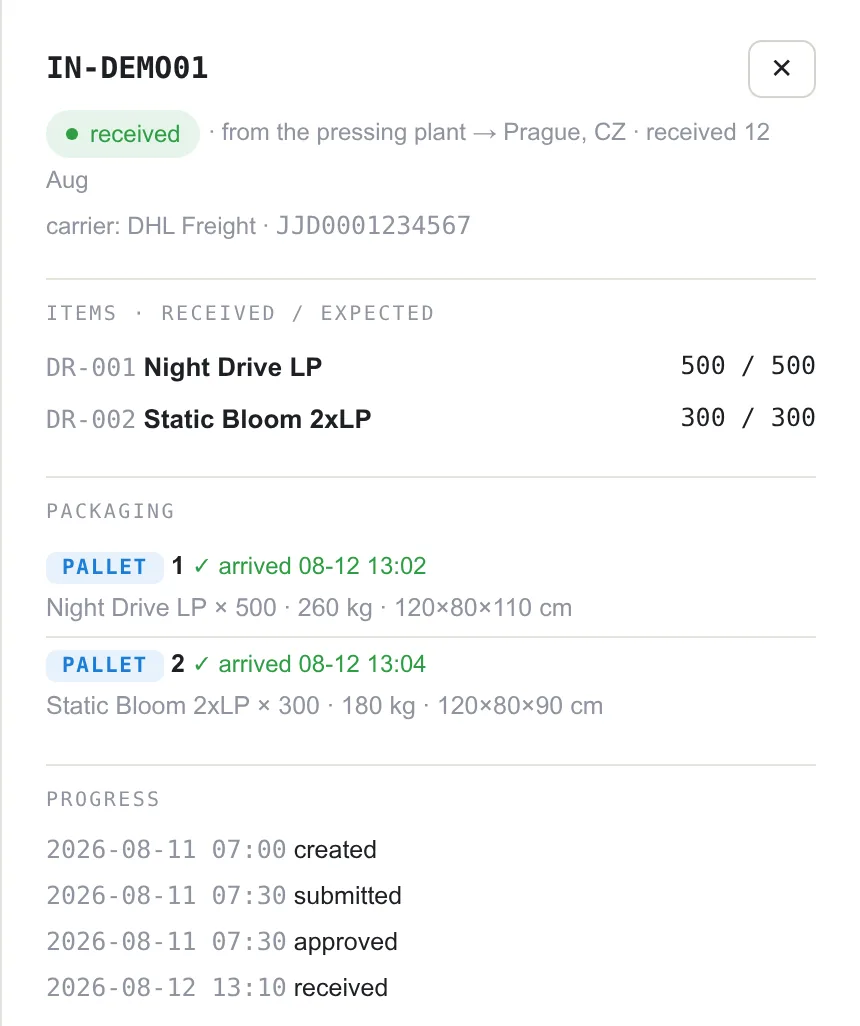
- When boxes arrive, the shipment changes to partially received and, once everything is in, received; you get an e-mail with the counts. The stock is available for orders from the moment each box is checked in.
- Open the shipment. Items shows received / expected per release; Packaging shows each pallet or box with its arrival time, the measured weight and size.
- A difference between received and expected is what we counted. If it does not match the plant's delivery note, e-mail us the note and we re-check.
Inbound statuses
| Status | Meaning | You can |
|---|---|---|
| draft | Started, not submitted. | Continue editing, delete the draft. |
| waiting for approval | Submitted, we are reviewing it. | Withdraw and edit. |
| announced | Approved and expected at the warehouse. | Download box labels; e-mail us for changes. |
| needs changes | Returned to you with a note. | Edit and submit again. |
| partially received | Some boxes checked in. | Watch received / expected. |
| received | Complete; stock is on the shelf. | Compare with the delivery note. |
7Pre-orders and release day
A pre-order campaign is the simplest way to work with us, and the case we are built for: you collect orders while the record is being pressed, and on release day everything ships at once. You do not need a store connection or a portal routine to start. One e-mail and one file are enough.
Run a pre-order through ShipMyLPs
- Tell us about the release as soon as you have the pressing confirmed: title, catalogue number, format (LP, 2xLP, 7"), quantity coming to us, release date, and who presses it. E-mail is fine. We create the release in your Inventory.
- Collect orders as usual in your store. If the store is connected (see Connect your store), they arrive in the portal on their own from day one. If not, export them when the campaign closes: use our XLS template, one row per order line, and upload it in the portal (see Upload orders from a file) or send it to us.
- Orders wait for the stock. Every order you send before the records are in is accepted and kept as Received; on our side it is marked "awaiting stock". Nothing ships early and nothing is lost.
- The records arrive. Pressed by us: they move straight to the shelf. Pressed elsewhere: announce the delivery (see Announce inbound stock) or e-mail us the packing list. The moment the stock is booked in, all waiting orders are released for packing.
- Release day. We pack and ship the campaign in one go, or hold it for the date you name. Tracking numbers go back to your store and appear in the portal as each parcel is labeled.
- Late orders that come in after the campaign closed are handled like any other order: from the connected store automatically, or send us another file.
Result: on release day your Orders tab turns from Preparing to Shipped in one batch, and your customers get their shipping notifications from your store the same day.
If some orders stay in Preparing: open them. Usually it is an address the carrier rejected (see Fix an address the carrier rejected) or a release we could not match; both show in the order and on the Dashboard under Needs your attention.
The order file
Download the XLS template. One row per order line: an order with two different releases takes two rows with the same order number. Columns: order number, name, company, street, street 2, city, state, ZIP, country (two-letter code), e-mail, phone, catalogue number, quantity. Keep the headers as they are and delete the example rows. Most stores export orders in a shape close to this; when in doubt, send us the export as it is and we map it.
8Connect your store
With a store connection, paid orders arrive in the portal on their own every few minutes and the tracking number is pushed back to the store the moment the label is printed, so your customer gets the shipping notification from the platform they bought on. The connection is set up together with us; the steps below are your part.
Prepare your catalogue: SKU = catalogue number
Your store gives every product a code, usually called SKU. Set it to the release's catalogue number from your Inventory; that is how an incoming order line finds the right record on our shelf.
- Open Inventory in the portal and note the Catalogue no. of every release you sell online.
- In your store, set the SKU of each product (and of each variant, for example colour) to exactly that catalogue number.
Result: every incoming order line is matched to the right release automatically. An order line whose SKU we do not know is held with a note instead of being shipped wrong; see Fix an order with an unknown item.
Connect ShipStation
For Shopify, WooCommerce, Etsy, Squarespace and every other store that ShipStation supports.
- In ShipStation open Settings → Account → API Settings and click Generate API Keys. Copy the API Key and API Secret.
- Send both to together with the name of the ShipStation store (or the tag) whose orders ShipMyLPs should ship. Orders in other stores or without the tag stay with you.
- We connect the store and run the first import; you get an e-mail when it is live.
Result: new orders that are paid and awaiting shipment appear in the portal within a few minutes. After we print a label, the order is marked shipped in ShipStation with the carrier and tracking number, which triggers your store's shipping notification.
Connect Big Cartel
- Ask us for the connect link; we send it by e-mail.
- Open the link, sign in to your Big Cartel account and click Approve when Big Cartel asks whether ShipMyLPs may read your orders and update shipping.
- Big Cartel has no SKU field. We pair each product and variant to your releases once: automatically where the product name starts with the catalogue number, otherwise we send you a list to confirm.
Result: paid orders arrive in the portal as they come in; after shipping, the order in Big Cartel is marked shipped with the tracking number.
Add ShipMyLPs as your Bandcamp fulfillment partner
- In Bandcamp open your Merch Orders page and click Add Fulfillment Partner.
- Enter and, if you sell from more than one shipping origin, limit the partner to the origin we ship for.
- Give each merch item a SKU equal to its catalogue number (Bandcamp: edit the item → SKU field).
- Tell us by e-mail that the partner is added; we switch the import on.
Result: paid Bandcamp orders appear in the portal; after shipping, Bandcamp gets the tracking number and marks the order shipped for your customer.
Fix an order with an unknown item
- An order whose item we could not match stays as Received with a note, and we e-mail you which SKU or product name was unknown.
- Either correct the SKU in your store (the next sync matches it), or tell us which release the item is. We assign it and the order continues into the next batch.
9E-mails and billing
Which e-mail means what
| Subject | When | What to do |
|---|---|---|
| Inbound shipment IN-… approved | We approved your announcement. | Download the box labels and pass them on. |
| Inbound shipment IN-… needs changes | We could not approve it as submitted. | Open it, read our note, edit and submit again. |
| Inbound shipment IN-… received | The delivery is booked in, with received / expected per release. | Check the counts against the delivery note; the stock is available for orders. |
| Order … cancelled | You or we cancelled an order. | Refund your customer in your store if needed. |
| Reset your ShipMyLPs password | You asked for a reset link. | Click the link and set a new password; it works once. |
| Your ShipMyLPs password was changed | A new password was saved. | Nothing, unless it was not you: write to us at once. |
| Monthly statement and invoice | Start of each month, sent by us. | Check the lines against the order export, pay the invoice. |
Your customer hears from your store, not from us: when we push the tracking number, the store sends its usual shipping notification. If you want, you can also send the customer tracking page link from the order detail.
How an order becomes an invoice line
Every shipped order is billed once, at the price for its destination zone and parcel weight from your price list. The price includes picking, the mailer or box, the label, postage and tracking. Extras are listed separately: additional records in the same parcel, inserts, returns handling, cancellation after picking. Storage is counted monthly per started 1,000 records. The statement arrives at the start of the following month; the order list export for that month gives you the detail behind it.
Whom to write and what to include
- for everything: order changes after preparation started, delivery issues, inbound changes after approval, wholesale and pallet shipments, new price lists, portal accounts for colleagues.
- Always include the order number (DR-…, or the FF-… number from the portal) or the shipment code (IN-…). With it we find the case in seconds.
- We answer on business days, Prague time.